Windows PowerShell Quick Reference

How to Access Arguments

To access command-line arguments used when starting a script use the automatic variable $args. You can cycle through the individual arguments in the $args collection by using code similar to this:

foreach ($i in $args) {$i}

To access a particular argument use the collection index number, with 0 representing the first item in the collection, 1 representing the second item, etc:

$args[0]

You can reference the last item in a collection by using the index number –1:

$args[-1]

How to Use Colored Text

To display text in a different color use the Write-Host cmdlet and specify a foreground color:

How to Get More Information

You can also specify a different background color: Continue reading “Windows PowerShell Quick Reference”

Nginx virtual host & php-fpm settings

共享我的当前VPS中关于nginx的一些设置,防止自己忘记了。

针对Nginx global的设置(没有写的,说明使用了默认的设置了):

#Nginx进程的用户名和用户组设置,最小权限原则
user www-data www-data;
#Nginx初始化工作进程数
worker_processes 4; 
#启用Nginx的核心安全策略,比如SQL注入,跨站之类
include /etc/nginx/naxsi_core.rules; 
#启用gzip压缩输出,对IE6禁用gzip
gzip on; 
gzip_disable "msie6";

针对Virtaul Host的设置:

首先看Reserve Proxy,

server { 
 ### server port and name ### 
 listen 443; 
 ssl on; 
 server_name ******.zhuoyue.me 
 ### SSL log files ### 
 access_log /var/log/nginx/ssl-access.log; 
 error_log /var/log/nginx/ssl-error.log; 
 
 ### SSL cert files ### 
 ssl_certificate /home/niyouzhu/nginxssl/server.crt; 
 ssl_certificate_key /home/niyouzhu/nginxssl/server.key; 
 
 ### Add SSL specific settings here ### 
 
 
 ssl_protocols SSLv3 TLSv1 TLSv1.1 TLSv1.2; 
 ssl_ciphers RC4:HIGH:!aNULL:!MD5; 
 ssl_prefer_server_ciphers on; 
 keepalive_timeout 60; 
 ssl_session_cache shared:SSL:10m; 
 ssl_session_timeout 10m; 
 
 ### We want full access to SSL via backend ### 
 location / {
 proxy_pass https://localhost:4200; 
 
 ### force timeouts if one of backend is died ## 
 proxy_next_upstream error timeout invalid_header http_500 http_502 http_503 http_504; 
 
 ### Set headers #### 
 proxy_set_header Accept-Encoding ""; 
 proxy_set_header Host $host; 
 proxy_set_header X-Real-IP $remote_addr; 
 proxy_set_header X-Forwarded-For $proxy_add_x_forwarded_for; 
 
 ### Most PHP, Python, Rails, Java App can use this header ### 
 #proxy_set_header X-Forwarded-Proto https;## 
 proxy_set_header X-Forwarded-Proto $scheme; 
 add_header Front-End-Https on; 
 proxy_redirect off; 
 }
 }

上面关于SSL自签名证书的创建,可以看我的另一篇文章:Ubuntu+LAMP+Nginx

再来看一般的Virtual Host设置, Continue reading “Nginx virtual host & php-fpm settings”

20年后的今天,世界首个转基因动物开始供人类食用

在美国,转基因作物最早问世于1996年,随后迅速被广泛接受。2013年,从种植面积来看,美国至少95%的甜菜,93%的大豆,90%的棉花和玉米均为转基因品种,这一数据来自美国农业部国家农业统计局。

2015年11月19日,经过全面的科学论证,美国食品与药品监督管理局(FDA)批准了世界上第一种食用转基因动物——AquAdvantage转基因大西洋鲑鱼(Atlantic salmon),俗称三文鱼。这种转基因三文鱼生长速度约为普通三文鱼的两倍,可节省75%的饲料成本。

转基因三文鱼最早于问世1989年,来自于美国加州大学伯克利分校开发的抗冻蛋白(antifreeze protein)技术。A / F Protein公司最初成立于1991年。1993年该公司向FDA寻求监管指导,1995年开始申请商业化。

1996年,A/F Protein公司从多伦多大学(University of Toronto)和纽芬兰纪念大学(Memorial University of Newfoundland)获得了AquAdvantage技术许可,随后于2000年重组成为两个独立的实体公司:A/F Protein公司,保留了抗冻蛋白技术;AquaBounty Farm公司,获得了AquAdvantage技术。AquaBounty Farm公司的总部设在马萨诸塞州沃尔瑟姆2004年更名为AquaBounty Technologies。 Continue reading “20年后的今天,世界首个转基因动物开始供人类食用”

LAMP+VPS+VPN+SSH

因为一些众所周知的原因,一直打算将服务器放到国外,周末的时候逛了国外的一些VPS服务商,选定了一款。原本服务器上的资料有7G多,包括一些站点和个人文档,当然也包括这个blog,这两天下班回到家后就SSH到VPS上折腾,现在终于算基本完善了,下面列出一些目前提供的服务。

VPN,国外的VPS当然第一件事就是架一个VPN,这样就可以自由FAN墙啦。VPN Service使用的是Pritunl。

因为公司的网络只提供80端口对外,无法在公司连到VPS,于是在VPS上提供了一个web-based ssh,使用的是shellinabox。

然后搭建了必须的3个服务:Apache2, MySqL, Php

Apache提供了Proxy reverse服务,以提供对Pritunl, shellinabox的代理访问

防火墙使用的是ufw.

[2015/12/1] Apache的并发性能不如nginx, 所以今天把apache换成了nginx,apache下的 url rewrite rule 很多不能在nginx下用,重写了一些url rewrite规则。

Markdown 语法

概述

宗旨

Markdown 的目标是实现「易读易写」。

可读性,无论如何,都是最重要的。一份使用 Markdown 格式撰写的文件应该可以直接以纯文本发布,并且看起来不会像是由许多标签或是格式指令所构成。Markdown 语法受到一些既有 text-to-HTML 格式的影响,包括 SetextatxTextilereStructuredTextGrutatextEtText,而最大灵感来源其实是纯文本电子邮件的格式。

总之, Markdown 的语法全由一些符号所组成,这些符号经过精挑细选,其作用一目了然。比如:在文字两旁加上星号,看起来就像*强调*。Markdown 的列表看起来,嗯,就是列表。Markdown 的区块引用看起来就真的像是引用一段文字,就像你曾在电子邮件中见过的那样。

兼容 HTML

Markdown 语法的目标是:成为一种适用于网络的书写语言。

Markdown 不是想要取代 HTML,甚至也没有要和它相近,它的语法种类很少,只对应 HTML 标记的一小部分。Markdown 的构想不是要使得 HTML 文档更容易书写。在我看来, HTML 已经很容易写了。Markdown 的理念是,能让文档更容易读、写和随意改。HTML 是一种发布的格式,Markdown 是一种书写的格式。就这样,Markdown 的格式语法只涵盖纯文本可以涵盖的范围。 Continue reading “Markdown 语法”

install gulp

1. Install gulp globally:

$ npm install --global gulp

2. Install gulp in your project devDependencies:

$ npm install --save-dev gulp

3. Create a gulpfile.js at the root of your project:

var gulp = require('gulp');

gulp.task('default', function() {
  // place code for your default task here
});

4. Run gulp:

$ gulp

The default task will run and do nothing.

To run individual tasks, use gulp <task> <othertask>.
在项目的根目录新建gulpfile.js,require需要的module

var gulp = require('gulp'),

    minifycss = require('gulp-minify-css'),

    concat = require('gulp-concat'),

    uglify = require('gulp-uglify'),

    rename = require('gulp-rename'),

    del = require('del');

压缩css

gulp.task('minifycss', function() {

    return gulp.src('src/*.css')      //压缩的文件

        .pipe(gulp.dest('minified/css'))   //输出文件夹

        .pipe(minifycss());   //执行压缩

});

压缩js

gulp.task('minifyjs', function() {

return gulp.src('src/*.js')

.pipe(concat('main.js'))    //合并所有js到main.js

.pipe(gulp.dest('minified/js'))    //输出main.js到文件夹

.pipe(rename({suffix: '.min'}))   //rename压缩后的文件名

.pipe(uglify())    //压缩

.pipe(gulp.dest('minified/js'));  //输出

});

执行压缩前,先删除文件夹里的内容

gulp.task('clean', function(cb) {

del(['minified/css', 'minified/js'], cb)

});

默认命令,在cmd中输入gulp后,执行的就是这个命令

gulp.task('default', ['clean'], function() {

gulp.start('minifycss', 'minifyjs');

});


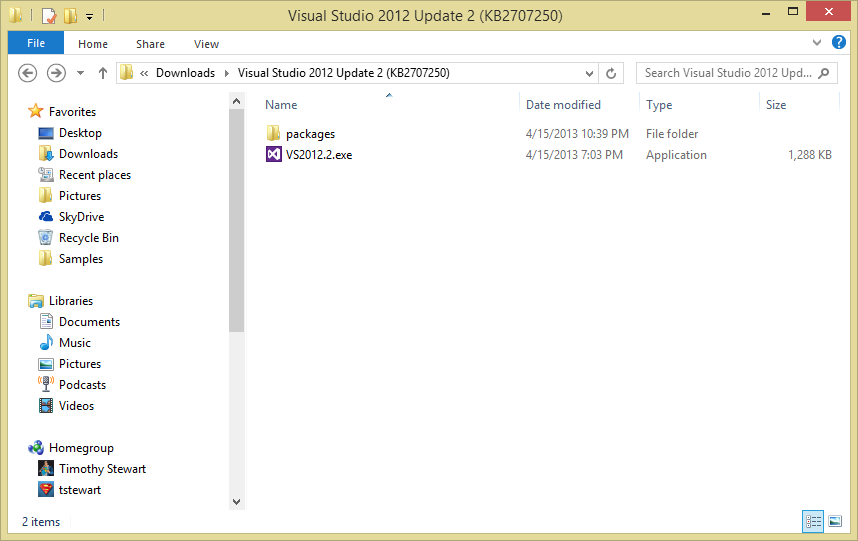
Visual Studio 2012 / 2013 Update 1 2 3 4 5 Offline Installer

  1. Get the update from Microsoft here. (updated with Update 4 link)
  2. Save the file to a folder.
  3. open the folder
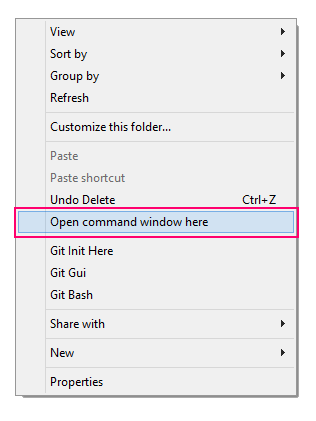
  4. Pro tip – Shift + right-click the background of the folder and choose ‘Open command window here’
  5. open_command_window
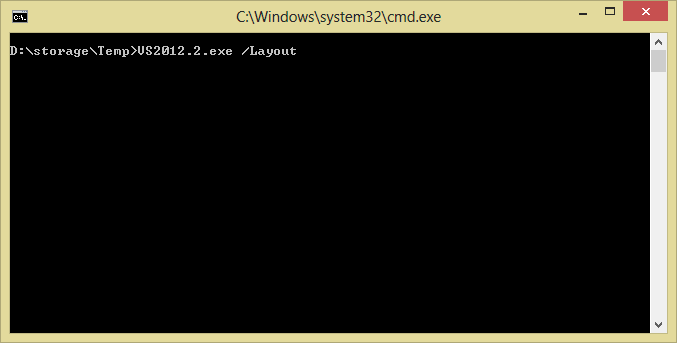
  6. in the command window type VS2013.4.exe /Layout
  7. (or VS2013.1.exe /Layout or VS2013.2.exe /Layout depending on your update)
  8. command_window
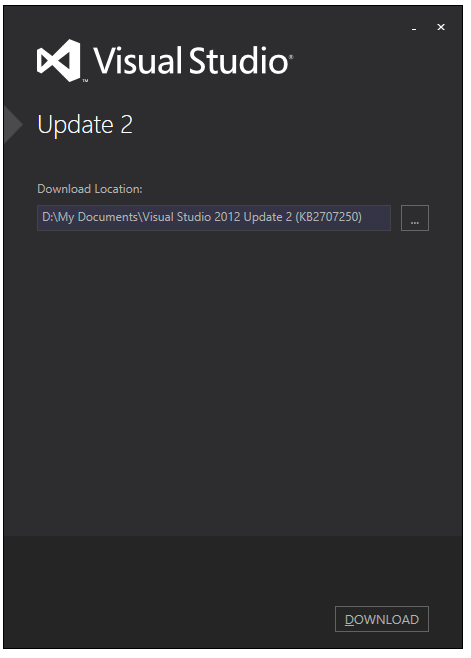
  9. It will then ask you where you would like to save and extract the files.
  10. vs2012_update_2_download_location
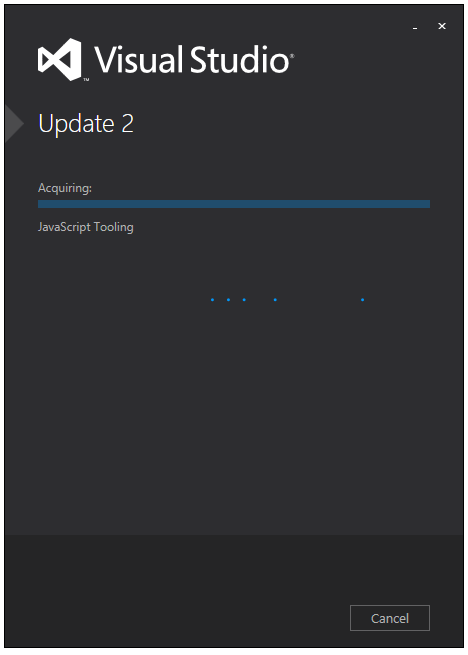
  11. This step will take some time depending on your download speed.  This is the step that adds time to the install when you choose the web installer.
  12. downloading_extracting_update_2
  13. You will now see a folder with the update installer along with all the source files.  You can now store this safe on a network share or your hard drive and update your installation of Visual Studio without downloading 2GB of files!
  14. vs2012_extracted
  15. This should work for any version of Visual Studio going forward.

Oracle Data Provider for .NET / ODP.NET connection strings

Using TNS

Data Source=TORCL;User Id=myUsername;Password=myPassword;

Example:

Data Source=localhost:1521/orcl; User Id=scott; Password=scott;

Using integrated security

Data Source=TORCL;Integrated Security=SSPI;

Using ODP.NET without tnsnames.ora

Data Source=(DESCRIPTION=(ADDRESS_LIST=(ADDRESS=(PROTOCOL=TCP)(HOST=MyHost)(PORT=MyPort)))(CONNECT_DATA=(SERVER=DEDICATED)(SERVICE_NAME=MyOracleSID)));
User Id=myUsername;Password=myPassword;

Using the Easy Connect Naming Method (aka EZ Connect)

The easy connect naming method enables clients to connect to a database without any configuration.

Data Source=username/password@//myserver:1521/my.service.com;

Port 1521 is used if no port number is specified in the connection string.

Make sure that EZCONNECT is enabled in the sqlnet.ora file. NAMES.DIRECTORY_PATH= (TNSNAMES, EZCONNECT)

‘//’ in data source is optional and is there to enable URL style hostname values

Easy Connect Naming Method to connect to an Instance

This one does not specify a service or a port.

Data Source=username/password@myserver//instancename;

Easy Connect Naming Method to connect to a dedicated server instance

This one does not specify a service or a port.

Data Source=username/password@myserver/myservice:dedicated/instancename;

Other server options: SHARED, POOLED (to use instead of DEDICATED). Dedicated is the default.

Specifying Pooling parameters

By default, connection pooling is enabled. This one controls the pooling mechanisms. The connection pooling service creates connection pools by using the ConnectionString property to uniquely identify a pool.

Data Source=myOracle;User Id=myUsername;Password=myPassword;Min Pool Size=10;
Connection Lifetime=120;Connection Timeout=60;Incr Pool Size=5;Decr Pool Size=2;

The first connection opened creates the connection pool. The service initially creates the number of connections defined by the Min Pool Size parameter.

The Incr Pool Size attribute defines the number of new connections to be created by the connection pooling service when more connections are needed.

When a connection is closed, the connection pooling service determines whether the connection lifetime has exceeded the value of the Connection Lifetime attribute. If so, the connection is closed; otherwise, the connection goes back to the connection pool.

The connection pooling service closes unused connections every 3 minutes. The Decr Pool Size attribute specifies the maximum number of connections that can be closed every 3 minutes.

Restricting Pool size

Use this one if you want to restrict the size of the pool.

Data Source=myOracle;User Id=myUsername;Password=myPassword;Max Pool Size=40;
Connection Timeout=60;

The Max Pool Size attribute sets the maximum number of connections for the connection pool. If a new connection is requested, but no connections are available and the limit for Max Pool Size has been reached the connection pooling service waits for the time defined by the Connection Timeout attribute. If the Connection Timeout time has been reached, and there are still no connections available in the pool, the connection pooling service raises an exception indicating that the request has timed-out.

Disable Pooling

Data Source=myOracle;User Id=myUsername;Password=myPassword;Pooling=False;

Using Windows user authentication

Oracle can open a connection using Windows user login credentials to authenticate database users.

Data Source=myOracle;User Id=/;

If the Password attribute is provided, it is ignored.

Operating System Authentication is not supported in a .NET stored procedure.

Privileged Connections

Oracle allows database administrators to connect to Oracle Database with either SYSDBA or SYSOPER privileges.

Data Source=myOracle;User Id=myUsername;Password=myPassword;DBA Privilege=SYSDBA;

SYSOPER is also valid for the DBA Privilege attribute.

Runtime Connection Load Balancing

Optimizes connection pooling for RAC database by balancing work requests across RAC instances.

Data Source=myOracle;User Id=myUsername;Password=myPassword;Load Balancing=True;

This feature can only be used against a RAC database and only if pooling is enabled (default).

批处理

摘自网络

例一、先给出一个最easy的批处理脚本让大家和它混个脸熟,将下面的几行命令保存为name.bat然后执行(以后文中只给出代码,保存和执行方式类似):

ping sz.tencent.com > a.txt
ping sz1.tencent.com >> a.txt
ping sz2.tencent.com >> a.txt
ping sz3.tencent.com >> a.txt
ping sz4.tencent.com >> a.txt
ping sz5.tencent.com >> a.txt
ping sz6.tencent.com >> a.txt
ping sz7.tencent.com >> a.txt
exit

是不是都能看的懂?是不是很easy?但它的作用却是很实用的,执行这个批处理后,可以在你的当前盘建立一个名为a.txt的文件,它里面记录的信息可以帮助你迅速找到速度最快的QQ服务器,从而远离“从服务器中转”那一痛苦的过程。这里>的意思,是把前面命令得到的东西放到后面所给的地方,>>的作用,和>的相同,区别是把结果追加到前一行得出的结果的后面,具体的说是下一行,而前面一行命令得出的结果将保留,这样可以使这个a.txt文件越来越大(想到如何搞破坏了??)。By the way,这个批处理还可以和其他命令结合,搞成完全自动化判断服务器速度的东东,执行后直接显示速度最快的服务器IP,是不是很爽?后面还将详细介绍。

例二、再给出一个已经过时的例子(a.bat):

@echo off
if exist C:\Progra~1\Tencent\AD\*.gif del C:\Progra~1\Tencent\AD\*.gif
a.bat

为什么说这是个过时的例子呢?很简单,因为现在已经几乎没有人用带广告的QQ了(KAO,我的QQ还显示好友三围呢!!),所以它几乎用不上了。但曾经它的作用是不可小窥的:删除QQ的广告,让对话框干干净净。这里用的地址是QQ的默认安装地址,默认批处理文件名为a.bat,你当然可以根据情况自行修改。在这个脚本中使用了if命令,使得它可以达到适时判断和删除广告图片的效果,你只需要不关闭命令执行后的DOS窗口,不按CTRL+C强行终止命令,它就一直监视是否有广告图片(QQ也再不断查看自己的广告是否被删除)。当然这个脚本占用你一点点内存,呵呵。

例三,使用批处理脚本查是否中冰河。脚本内容如下:

@echo off
netstat -a -n > a.txt
type a.txt | find “7626” && echo “Congratulations! You have infected GLACIER!”
del a.txt
pause & exit

这里利用了netstat命令,检查所有的网络端口状态,只需要你清楚常见木马所使用的端口,就能很easy的判断出来是否被人种了冰河。然这不是确定的,因为冰河默认的端口7626,完全可以被人修改。这里介绍的只是方法和思路。这里介绍的是方法和思路稍做改动,就变成可以检查其他木马的脚本了,再改动一下,加进去参数和端口及信息列表文件后,就变成自动检测所有木马的脚本了。呵呵,是不是很过瘾?脚本中还利用了组合命令&&和管道命令|,后面将详细介绍。

例四,借批处理自动清除系统垃圾,脚本如下:

Continue reading “批处理”