POSIX

This post is copied from Wikipedia.

The Portable Operating System Interface (POSIX)[1] is a family of standards specified by the IEEE Computer Society for maintaining compatibility between operating systems. POSIX defines the application programming interface (API), along with command line shells and utility interfaces, for software compatibility with variants of Unix and other operating systems.[2][3]

Name

Originally, the name “POSIX” referred to IEEE Std 1003.1-1988, released in 1988. The family of POSIX standards is formally designated as IEEE 1003 and the international standard name is ISO/IEC 9945.

The standards emerged from a project that began circa 1985. Richard Stallman suggested the name POSIX to the IEEE instead of former IEEE-IX. The committee found it more easily pronounceable and memorable, and thus adopted it.[2][4]

Overview

Unix was selected as the basis for a standard system interface partly because it was “manufacturer-neutral”. However, several major versions of Unix existed—so there was a need to develop a common denominator system. The POSIX specifications for Unix-like operating systems originally consisted of a single document for the core programming interface, but eventually grew to 19 separate documents (POSIX.1, POSIX.2, etc.).[5] The standardized user command line and scripting interface were based on the UNIX System V shell.[6] Many user-level programs, services, and utilities (including awk, echo, ed) were also standardized, along with required program-level services (including basic I/O: file, terminal, and network). POSIX also defines a standard threading library API which is supported by most modern operating systems. In 2008, most parts of POSIX were combined into a single standard (IEEE Std 1003.1-2008, also known as POSIX.1-2008). Continue reading “POSIX”

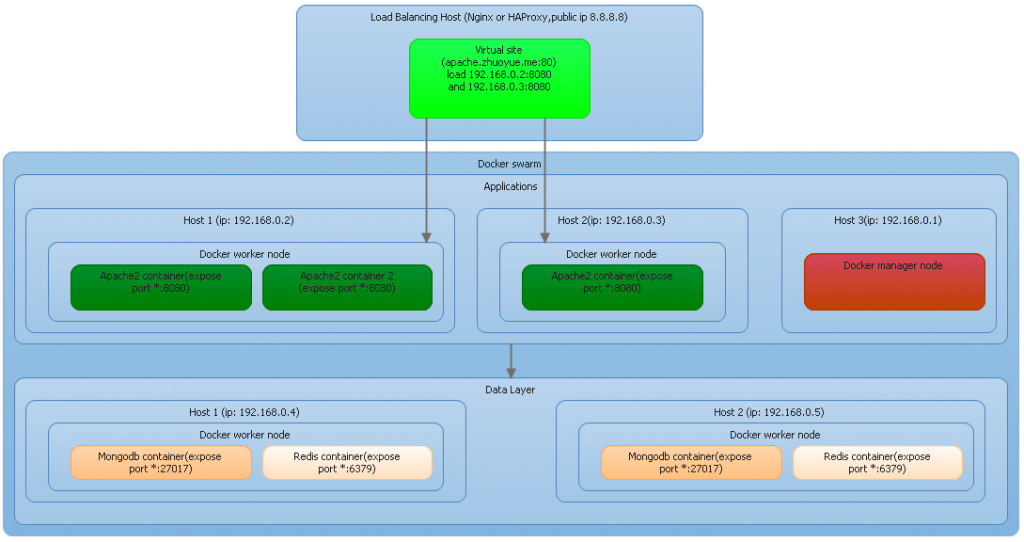
浅谈Docker swarm+HAProxy/Nginx

就不废话了,直接画出系统逻辑架构图:docker-arch

这里有些问题简单交待一下:

  1. HAProxy/Nginx作为External network的入口
  2. Docker swarm是Internal network,不对外公开
  3. HAProxy/Nginx在配置Load Balance时,每个Server的定义仍然使用的是各Docker work nodes的IP地址(最大的提高性能),在Nginx中类似于下面的配置片断:
    upstream apache2{
    server 192.168.0.2:8080;
    server 192.168.0.3:8080;
    }
    
    server{
    listen 80;
    server_name apache.zhuoyue.me;
    location /{
    proxy_pass http://apache2;
    }
    }
  4. Docker swarm也有自己的Load Balance和Health check功能和规则,在上一项的描述中,我们也可以在Nginx中不去指定upstream,而让swarm去进行load balancing,那么在nginx就可以这样配置:
    server{
    listen 80;
    server_name apache.zhuoyue.me;
    location /{
    proxy_pass http://192.168.0.2:8080;
    }
    }

    但这种配置有一个缺点:那就是192.168.0.2这台host上的docker process不能halt。

  5. 那么整个docker swarm创建过程可能是这样的:
    1. 在docker manager node上创建了一个task:
      docker service create --name apache2 --publish 8080:80 --replicas 3 apache2

      我们创建了一个名为apache2的task,通过定义replicas=3创建了总计3个image name为apache2的containers, 并且它们暴露8080 port,用以映射container内部的apache httpd 的80端口

    2. 该service task被分配在2个work nodes上运行(IP地址分别为192.168.0.2, 192.168.0.3,其中192.168.0.2上会运行着2个container)
    3. 因为某不知名原因192.168.0.2中的2个apache2 container 都被halt,比如执行了命令
      docker stop containername

      然而在halt之前你是可以使用192.168.0.2:8080访问apache2

    4. 此时你以为无法再继续使用192.168.0.2:8080访问apache2了,但事实并非如此,因为worker node工作在swarm模式下,192.168.0.2:8080请求会被docker swarm ingress路由到一个可用的contianer上继续执行(192.168.0.3:8080),并且它不同于重定向,响应IP地址仍然是192.168.0.2:8080)

Install docker on Ubuntu

所在的Team最近要面向微服务做一些创新,于是开始学习起Micro Service,在行业中,针对Micro Service有很多实现,我比较关注Docker,因为它覆盖的面比较广,各方面的需求它都会相应的解决方案,另外就是安装配置也比较简单。这篇文件摘自Docker官方站点,告诉大家怎么在Ubuntu上安装Docker(PS. 原本我是想在Windows上安装Docker的,可是Docker for Windows只supports win 10,无奈只能在win7 pro上通过virtual box+ubuntu trusty lts来实现安装docker,刚好之前做Hadoop分享的时候,已经安装了vitual box+ubuntu)。

原文 地址 https://docs.docker.com/engine/installation/linux/ubuntulinux/

Install Docker on Ubuntu

Docker is supported on these Ubuntu operating systems:

  • Ubuntu Xenial 16.04 (LTS)
  • Ubuntu Wily 15.10
  • Ubuntu Trusty 14.04 (LTS)
  • Ubuntu Precise 12.04 (LTS)

This page instructs you to install using Docker-managed release packages and installation mechanisms. Using these packages ensures you get the latest official release of Docker. If you are required to install using Ubuntu-managed packages, consult the Ubuntu documentation. Continue reading “Install docker on Ubuntu”

在Ubuntu16.04LTS上安装php5.6

1. Add PHP 5.6 package sources to your system:

sudo add-apt-repository ppa:ondrej/php5-5.6

2. Update

sudo apt-get update

3. Install PHP

sudo apt-get install php5.6

4.Integrated with Apache2

libapache2-mod-php5.6

5. Enable php5.6

a2dismod php7.0
a2enmod php5.6
service apache2 restart

using nginx as http load balancer

Introduction

Load balancing across multiple application instances is a commonly used technique for optimizing resource utilization, maximizing throughput, reducing latency, and ensuring fault-tolerant configurations.

It is possible to use nginx as a very efficient HTTP load balancer to distribute traffic to several application servers and to improve performance, scalability and reliability of web applications with nginx.

Load balancing methods

The following load balancing mechanisms (or methods) are supported in nginx:

  • round-robin — requests to the application servers are distributed in a round-robin fashion,
  • least-connected — next request is assigned to the server with the least number of active connections,
  • ip-hash — a hash-function is used to determine what server should be selected for the next request (based on the client’s IP address).

Default load balancing configuration

The simplest configuration for load balancing with nginx may look like the following:

http {
    upstream myapp1 {
        server srv1.example.com;
        server srv2.example.com;
        server srv3.example.com;
    }

    server {
        listen 80;

        location / {
            proxy_pass http://myapp1;
        }
    }
}

In the example above, there are 3 instances of the same application running on srv1-srv3. When the load balancing method is not specifically configured, it defaults to round-robin. All requests are proxied to the server group myapp1, and nginx applies HTTP load balancing to distribute the requests. Continue reading “using nginx as http load balancer”

Sendmail Settings

通常新安装的Linux主机,hostname我们不会将其设置成真实的FQDN形式,这会造成在后面做一些应用服务器时,产生一些影响,比如mail server,做为mail server,如果你的当前hostname是linux.local,而你希望以[email protected]发送邮件出去,那么在没有进行其它配置的情况下,当你将邮件发送后,接收人那里会显示[email protected],并由[email protected]代发。有一些邮件接收服务器就会将你这封邮件做为垃圾邮件,放在垃圾箱里,那么该怎么更改呢,以做到只显示[email protected]呢,下面是sendmail的设置方式:

  1. vim /etc/mail/sendmail.mc
    MASQUERADE_AS(`zhuoyue.me')dnl 
    FEATURE(`masquerade_envelope')dnl 
    FEATURE(`masquerade_entire_domain')dnl 
    MASQUERADE_DOMAIN(`zhuoyue.me')dnl
  2. make  -f /etc/mail/Makefile
  3. service sendmail reload

Nginx virtual host & php-fpm settings

共享我的当前VPS中关于nginx的一些设置,防止自己忘记了。

针对Nginx global的设置(没有写的,说明使用了默认的设置了):

#Nginx进程的用户名和用户组设置,最小权限原则
user www-data www-data;
#Nginx初始化工作进程数
worker_processes 4; 
#启用Nginx的核心安全策略,比如SQL注入,跨站之类
include /etc/nginx/naxsi_core.rules; 
#启用gzip压缩输出,对IE6禁用gzip
gzip on; 
gzip_disable "msie6";

针对Virtaul Host的设置:

首先看Reserve Proxy,

server { 
 ### server port and name ### 
 listen 443; 
 ssl on; 
 server_name ******.zhuoyue.me 
 ### SSL log files ### 
 access_log /var/log/nginx/ssl-access.log; 
 error_log /var/log/nginx/ssl-error.log; 
 
 ### SSL cert files ### 
 ssl_certificate /home/niyouzhu/nginxssl/server.crt; 
 ssl_certificate_key /home/niyouzhu/nginxssl/server.key; 
 
 ### Add SSL specific settings here ### 
 
 
 ssl_protocols SSLv3 TLSv1 TLSv1.1 TLSv1.2; 
 ssl_ciphers RC4:HIGH:!aNULL:!MD5; 
 ssl_prefer_server_ciphers on; 
 keepalive_timeout 60; 
 ssl_session_cache shared:SSL:10m; 
 ssl_session_timeout 10m; 
 
 ### We want full access to SSL via backend ### 
 location / {
 proxy_pass https://localhost:4200; 
 
 ### force timeouts if one of backend is died ## 
 proxy_next_upstream error timeout invalid_header http_500 http_502 http_503 http_504; 
 
 ### Set headers #### 
 proxy_set_header Accept-Encoding ""; 
 proxy_set_header Host $host; 
 proxy_set_header X-Real-IP $remote_addr; 
 proxy_set_header X-Forwarded-For $proxy_add_x_forwarded_for; 
 
 ### Most PHP, Python, Rails, Java App can use this header ### 
 #proxy_set_header X-Forwarded-Proto https;## 
 proxy_set_header X-Forwarded-Proto $scheme; 
 add_header Front-End-Https on; 
 proxy_redirect off; 
 }
 }

上面关于SSL自签名证书的创建,可以看我的另一篇文章:Ubuntu+LAMP+Nginx

再来看一般的Virtual Host设置, Continue reading “Nginx virtual host & php-fpm settings”

LAMP+VPS+VPN+SSH

因为一些众所周知的原因,一直打算将服务器放到国外,周末的时候逛了国外的一些VPS服务商,选定了一款。原本服务器上的资料有7G多,包括一些站点和个人文档,当然也包括这个blog,这两天下班回到家后就SSH到VPS上折腾,现在终于算基本完善了,下面列出一些目前提供的服务。

VPN,国外的VPS当然第一件事就是架一个VPN,这样就可以自由FAN墙啦。VPN Service使用的是Pritunl。

因为公司的网络只提供80端口对外,无法在公司连到VPS,于是在VPS上提供了一个web-based ssh,使用的是shellinabox。

然后搭建了必须的3个服务:Apache2, MySqL, Php

Apache提供了Proxy reverse服务,以提供对Pritunl, shellinabox的代理访问

防火墙使用的是ufw.

[2015/12/1] Apache的并发性能不如nginx, 所以今天把apache换成了nginx,apache下的 url rewrite rule 很多不能在nginx下用,重写了一些url rewrite规则。

VIM 基本命令

VIM For windows默认安装后,在桌面上会有2个Shortlink, 但是这2个link都是带有参数的, 一个是/y, 进去以后就是insert模式, 非常不方便。 一个是/R, 进去以后永远是Readonly, 无法更改数据。 所以我们需要直接将gvim.exe建立快捷方式至桌面, 并且copy 一份到system32, 以便于命令行直接启动。

Linux下的vim命令, 大多在windows下也可以使用, 这里截取了一段来自网上的Vim commands.

Continue reading “VIM 基本命令”

Ubuntu+LAMP+Nginx

好久没有玩linux了, 下午的时候有点时间, 搭了一套环境.

使用的VMware workstation安装的Ubuntu 12 Server, 网络连接使用的NAT, Remove掉了Floppy.

Host是Intel Core i5-4570 3.2GHz的64Bit CPU, Memory 是4G. 配置还可以, 故给VMware配置了1G的Memory, 20G的Disk.

Ubuntu的安装过程现在是越来越简单了, 过程也记不清了, 这里就不说了.  总之顺利安装成功.

Host 的IP是 192.168.82.81, Client的IP是192.168.206.129.

因为Company里有Security Audit, 所以需要通过Proxy才能上外网, 故第一步给Ubuntu设置代理服务器.

editor /etc/profile

添加:

http_proxy=http://192.168.88.80:3128
https_proxy=http://192.168.88.80:3128
ftp_proxy=http://192.168.88.80:3128
export http_proxy https_proxy ftp_proxy

然后Reboot.

OK, 可以上外网了. 现在开始更新apt源, 由于默认安装后的源是Ubuntu在国外的服务器, 非常慢, 所以先更改源地址:

editor /etc/apt/sources.list

然后在所有的archive.ubuntu.com前加上cn., 即: http://cn.archive.ubuntu.com/ubuntu/ , cn.archive.ubuntu.com 是由阿里巴巴维护的, 放在阿里云上, 速度是很快的.

下面开始 update source list:

atp-get update

下面开始安装VIM, 使用Editor编辑器实在不顺手:

apt-get install vim

下面开始安装LAMP:

tasksel install lamp-server

下面开始安装Nginx:

apt-get install nginx

下面开始安装phpMyAdmin:

apt-get install phpmyadmin

至此nginx+lamp+phpmyadmin安装结束. 现在要开始进行配置.

因为nginx会占用80端口, 所以apache将无法启动, 因为nginx是进行对外公布的load blancing, 所以nginx会占用80和443 两个端口. 所以先来修改apache的端口, 以及启用apache对于SSL的支持.

vim /etc/apache/prots.conf

将apache的监听http协议的端口改为8080, SSL协议的端口改为4433

NameVirtualHost *:8080
Listen 8080
NameVirtualHost *:4433

<IfModule mod_ssl.c>
Listen 4433
</IfModule>
<IfModule mod_gnutls.c>
Listen 4433
</IfModule>

然后切换目录到/etc/apache2/mods-enabled/

cd /etc/apache2/mods-enabled/

执行命令下面命令, 以启用apache对于SSL的支持:

ln -s ../mods-available/ssl.conf
ln -s ../mods-available/ssl.load

然后将apache自带的ssl站点进行启用:

cd /etc/apache2/sites-enabled/
ln -s ../sites-available/default-ssl

然后对000-default和default-ssl这2个virtual host进行端口更改:

vi /etc/apache2/sites-enabled/000-default
vi /etc/apache2/sites-enabled/default-ssl

将000-default中的VirtualHost *:80改为VirtualHost *:8080, 将default-ssl中的VirtualHost *:443改为VirtualHost *:4433

在Host上使用IE打开Http://192.168.206.129:8080和https://192.168.206.129:4433, 如果都可以打开, 说明apache的配置成功.

现在来配置nginx, 使其进行反向代理和负载均衡:

vi /etc/nginx/sites-enabled/default

需要分别配置http和https的load blancing, 其中192.168.82.81是Host上安装的IIS:

upstream loadblancing{
server 192.168.82.81:80;
server 127.0.0.1:8080;
}

upstream loadblancingssl{
server 192.168.82.81:443;
server 127.0.0.1:4433;
}

然后在server节点里, 将location节点修改为:

location /{
proxy_pass http://loadblancing;
}

然后定位到文件末页, 将关于Https Server的注释符号”#” 全拿掉, 使其启用.

并且将其location节点修改为:

location / {
https://loadblancingssl;
}

另外, 需要将ssl证书和key的位置进行修改, 在后面我们需要创建open ssl 证书:

ssl_certificate /root/server.crt;
ssl_certificate_key /root/server.key;

现在来创建openssl证书, 首先来创建私钥, 创建私钥的过程中会要求输入密码:

openssl
genrsa -aes256 -out server.key 1024

创完私钥, 来创建证书的请求文件:

openssl
req -new -key server.key -out server.csr

请求文件创建成功后, 我们来把私钥做个备份:

cp server.key server.key.bak

我们把带密码的key取消掉口令, 以便Nginx可以正常使用:

openssl
rsa -in server.key.bak -out server.key

然后我们使用x509来颁发证书, 得到证书文件server.crt :

openssl
x509 -req -days 365 -in server.csr -signkey server.key -out server.crt

现在我们来重启Nginx:

/etc/init.d/nginx restart

OK, 结束. 现在可以在host上打开IE, 浏览http://192.168.206.129和https://192.168.206.129, 会发现相同的URL在点击刷新后, 不断出现不同的页面, 这是因为一个是Client上的Apache首页, 一个是Host上的IIS首页.