What’s FodyWeaver

In almost all .NET applications you encounter lot of boilerplate code which although has pretty standard implementation but is quite important from implementation point of view. Some common examples are overridden ToString, Equals  method for you model classes. Or implementing IDisposable or INotifyPropertyChanged. In all these examples most of the code is pretty standard.

One of the ways of automating this code is to automatically inject this in your generated MSIL (which stands for Microsoft intermediate language).This process of injecting code post compilation directly into generated intermediate language is known as .NET assembly weaving or IL weaving (similar to byte code weaving in Java).

If you do this before compilation i.e. add source code lines before compilation it is known as Source code weaving.

What is Fody and how it works.

Fody is an extensible library for weaving .NET assembly written by Simon Cropp. It adds post build task in MS build pipeline to manipulate generated IL. Usually this requires lot of plumbing code which is what fody provides. Fody provides extensible add-in model where anybody can use core fody package (providing basic code for adding post build task and manipulating IL) and create their own specific add-ins. E.g. Equals. Fody generates Equals and GetHashCode method implementation and ToString. Fody generates ToString implementation for your classes.

Below figure shows how the whole process works.

You can also use the same technique for implementing AOP, logging, profiling methods etc.

Fody uses Mono.Cecil which is a library for manipulating intermediate language and in usage feels quite similar to .NET reflection APIs. As far as IL manipulation goes Mono.Cecil seems like only game in the town. Chances are high that if you have used plug-in for IL manipulation they would be using Mono.Cecil internally. Continue reading “What’s FodyWeaver”

What is Low Code

Why low code matters right now

For modern businesses, the ability to pivot and adapt to a rapidly shifting world of work has become essential. How your company responds to these changes—and how quickly you respond—can make or break your long-term success. As it becomes more of a necessity, your company needs to rapidly embrace digital transformation to meet customers’ growing demands and keep up with the competition.

Your business can implement this change in many ways and using low-code development is an increasingly popular approach for businesses to adapt to constantly changing conditions.

What’s the appeal? With a low-code development platform, companies can quickly create and deliver business applications without having to rely on a large amount of manual programming or user training. This not only saves time and makes companies more efficient and productive, but it also allows you to focus on the apps that require the most attention, like customer experience and automation apps.

What is low code?

Simply put, low code is a smart way to put power back into your hands. Specifically, it’s a method of software and application development that allows your workers to create enterprise-grade business apps using drag-and-drop functionality and visual guidance—with very little or no coding experience or knowledge.

The appeal of this approach is that almost anyone can develop an app. Citizen developers—employees in your organization who don’t necessarily have technical or programming expertise—can quickly and efficiently build applications on low-code platforms.

Enabling anyone to create applications using this simplified application development method frees up your professional developers and IT teams to devote their time to creating more complex, business-critical apps. And when these developers use low-code platforms, it helps them work faster because they don’t have to write code line by line.

If you’re searching for an application development method that uses visual modeling, you might also consider using a no-code application platform. Low code and no code share some similarities, including their key purpose. Both platforms were created as an alternative to traditional application development, and they both make it easier for your business to enable citizen developers to build new apps.

There are some key differentiators, though. With low-code platforms, developers need at least a basic understanding of programming, while no-code platforms take a drag-and-drop approach and don’t require any coding knowledge. No code is ideal for building smaller apps, and its capabilities can be limited. Low code, on the other hand, tends to allow developers to create more sophisticated apps.

Low-code development

Low-code platforms have many benefits for your business, such as providing tools to boost organizational agility and empowering employees to quickly build professional-grade apps that solve business challenges.

Low code can help your business:

  • Save time by enabling almost anyone in your company to develop apps rather than waiting for development teams to do it.
  • Boost productivity by freeing up your developers’ schedules so they can focus on building apps that require coding, and ultimately, helping teams work more efficiently.
  • Reduce costs by allowing your business to use existing staff as citizen developers rather than hiring new developers. This enables your professional developers to create more apps in less time.
  • Become more flexible by using low-code platforms to easily change apps without having to spend a lot of time writing code.

Low-code application development does come with challenges, however. While low code doesn’t require a lot of manual coding, your IT teams aren’t completely off the hook—they still must make themselves available to guide both citizen and professional developers along the way.

Low-code development can also make it harder for your company to see what your employees are building, which can create security issues. With on-premises low-code platforms, it’s often difficult for IT to have any visibility into development projects. However, that issue can be solved by moving to the cloud, which allows you to apply rule-based permissions.

What can businesses build with low-code platforms?

Here are just a few practical use cases about what you can create with a low-code platform:

  • Customer experience apps. With the rise of digital transformation, today’s customers expect easy-to-use, well-functioning mobile apps. Low code allows you to modernize existing apps and significantly speed up new application development.
  • Line-of-business apps. When apps are outdated, can no longer support current processes, and aren’t providing an ideal user experience, a low-code platform can help migrate these apps and simplify process automation.
  • Automation and efficiency apps. These apps give you the tools you need to automate tasks and reduce your dependence on manual, paper-based processes.


Evaluate vSphere vs. OpenStack for your organization

本文摘自网络。

VMware vSphere and open source project OpenStack present two different ways of structuring an infrastructure. In the vSphere vs. OpenStack debate, choosing the right infrastructure for your organization’s data center comes down to your staff’s expertise, your existing infrastructure requirements, your storage setup and whether you can compromise with vSphere Integrated OpenStack.

VSphere is the predominant virtualization software. It encompasses VMware’s server virtualization product suite, including its ESXi hypervisor, vCenter Server, an HTML5-based management interface and other popular virtualization components.

OpenStack is a collection of open source software, providing a cloud framework that enables you to create and manage both public and private cloud infrastructures. Although you can build a cloud computing environment off of a VMware vSphere infrastructure, OpenStack forms a cloud OS that can organize, provision and manage large resource pools. It also comes with many compute, storage, networking, content delivery, security and analytics resources.

To decide between vSphere vs. OpenStack, you must decide whether your organization needs a primarily cloud or virtualized environment, compare vSphere and OpenStack features and capabilities and evaluate the long-term cost of committing to each.

The cloud vs. virtualization debate

To decide between using cloud infrastructure or virtualized infrastructure, first consider the infrastructure your organization already runs. Identify the costs that could arise as a result of altering or exchanging infrastructure styles and consider the expertise of your IT staff.

If you already use VMware, consider extending a VMware facility to support cloud bursting, which creates business continuity and protects your VMware investment while also enabling you to take advantage of the cloud. However, you must understand how to incorporate cloud automation into your IT processes before attempting to introduce cloud bursting.

Many have implemented VMware Integrated OpenStack to get the best of both vSphere and OpenStack. VIO is an OpenStack distribution for companies that want to deploy and manage an OpenStack private cloud atop an existing vSphere infrastructure.


Public cloud prices have also dropped since public cloud first hit the market. Still, you must weigh the cost difference of paying for a monthly cloud subscription versus an upfront fixed-cost purchase of hardware.

VSphere, OpenStack and containers

VMware was late to introduce cloud products compared to other vendors — specifically, OpenStack, its competitor in private cloud deployments. OpenStack sandboxes are common and easy to deploy; however, OpenStack has struggled with managing scale, user friendliness and feature completeness.

Containers have represented a struggle for many vendors, including OpenStack and VMware. The OpenStack community has developed several service modules to run container instances on OpenStack. Certain releases of the platform, such as 2017’s Ocata release, include container management services that enable you to run container orchestrators such as Apache Mesos, Docker and Kubernetes.

In 2019, VMware introduced its Project Pacific initiative to build Kubernetes and container management capabilities natively into vSphere. Earlier initiatives, such as Pivotal Container Service, also focused on incorporating Kubernetes support into vSphere and aimed to simplify Kubernetes deployment and management.

Storage differences between vSphere vs. OpenStack

A major difference between vSphere and OpenStack is how each handles storage, backup and disaster recovery.

VSphere maps storage to ESXi, where each ESXi host accesses its storage through a logical unit number mapped to a data store. This approach includes a degree of storage management automation, and you can rebalance VMs across a vSphere cluster based on storage capacity and I/O. You can use a number of APIs to enable your hypervisor to direct storage and manage VMs more effectively.

OpenStack environments, on the other hand, require persistent block storage. This approach requires external storage that supports OpenStack’s Cinder API. However, OpenStack does have the direct object storage that VMware vSphere lacks.

With OpenStack, you save on storage infrastructure costs, but it can increase management costs. The reverse is true with vSphere. Consider your organization’s priorities and resource allocation when you think about the storage requirements of vSphere vs. OpenStack.

Compromising with VMware Integrated OpenStack

Many have implemented VMware Integrated OpenStack (VIO) to get the best of both vSphere and OpenStack. VIO is an OpenStack distribution for companies that want to deploy and manage an OpenStack private cloud atop an existing vSphere infrastructure. It provides developers with OpenStack APIs that can access a VMware virtualized infrastructure and has been tested and supported by VMware.

IT managers and experts have praised VIO for combining the maturity of a VMware environment with the agility of OpenStack. It has utilities that can automate patching and upgrading, and it offers critical VMware products, including vSphere, NSX and VSAN, through OpenStack APIs. Most importantly, it eliminates the requirement to have separate platforms for older, legacy applications that remain critical to an organization and for newer, more modern applications.

However, VIO features can be expensive. You can gain access to VIO with a vSphere Enterprise Plus license, but it doesn’t include support. VIO support is purchased on a per-CPU basis. Newer versions of VIO with more support features are more expensive than older versions without such updates.

Markdown Syntax

Overview

Nearly all Markdown applications support the basic syntax outlined in John Gruber’s original design document. There are minor variations and discrepancies between Markdown processors, those are noted inline wherever possible.

Headings

To create a heading, add number signs (#) in front of a word or phrase. The number of number signs you use should correspond to the heading level. For example, to create a heading level three (<h3>), use three number signs (e.g., ### My Header).

Markdown HTML Rendered Output
# Heading level 1 <h1>Heading level 1</h1> Heading level 1
## Heading level 2 <h2>Heading level 2</h2> Heading level 2
### Heading level 3 <h3>Heading level 3</h3> Heading level 3
#### Heading level 4 <h4>Heading level 4</h4> Heading level 4
##### Heading level 5 <h5>Heading level 5</h5> Heading level 5
###### Heading level 6 <h6>Heading level 6</h6> Heading level 6

Alternate Syntax

Alternatively, on the line below the text, add any number of == characters for heading level 1 or — characters for heading level 2.

Markdown HTML Rendered Output
Heading level 1
===============
<h1>Heading level 1</h1> Heading level 1
Heading level 2
—————
<h2>Heading level 2</h2> Heading level 2

Heading Best Practices

Markdown applications don’t agree on how to handle a missing space between the number signs (#) and the heading name. For compatibility, always put a space between the number signs and the heading name.

  Do this   Don’t do this
# Here’s a Heading #Here’s a Heading

Paragraphs

To create paragraphs, use a blank line to separate one or more lines of text.

Markdown HTML Rendered Output
I really like using Markdown.

I think I’ll use it to format all of my documents from now on.

<p>I really like using Markdown.</p>

<p>I think I’ll use it to format all of my documents from now on.</p>

I really like using Markdown.

I think I’ll use it to format all of my documents from now on.

Paragraph Best Practices

Unless the paragraph is in a list, don’t indent paragraphs with spaces or tabs.

  Do this   Don’t do this
Don’t put tabs or spaces in front of your paragraphs.

Keep lines left-aligned like this.

    This can result in unexpected formatting problems.

Don’t add tabs or spaces in front of paragraphs.

Line Breaks

To create a line break (<br>), end a line with two or more spaces, and then type return.

Markdown HTML Rendered Output
This is the first line.
And this is the second line.
<p>This is the first line.<br>
And this is the second line.</p>
This is the first line.
And this is the second line.

Line Break Best Practices

You can use two or more spaces (commonly referred to as “trailing whitespace”) for line breaks in nearly every Markdown application, but it’s controversial. It’s hard to see trailing whitespace in an editor, and many people accidentally or intentionally put two spaces after every sentence. For this reason, you may want to use something other than trailing whitespace for line breaks. Fortunately, there is another option supported by nearly every Markdown application: the <br> HTML tag.

For compatibility, use trailing white space or the <br> HTML tag at the end of the line.

There are two other options I don’t recommend using. CommonMark and a few other lightweight markup languages let you type a backslash () at the end of the line, but not all Markdown applications support this, so it isn’t a great option from a compatibility perspective. And at least a couple lightweight markup languages don’t require anything at the end of the line — just type return and they’ll create a line break.

  Do this   Don’t do this
First line with two spaces after.
And the next line.First line with the HTML tag after.<br>
And the next line.
First line with a backslash after.
And the next line.First line with nothing after.
And the next line.

Emphasis

You can add emphasis by making text bold or italic.

Bold

To bold text, add two asterisks or underscores before and after a word or phrase. To bold the middle of a word for emphasis, add two asterisks without spaces around the letters.

Markdown HTML Rendered Output
I just love **bold text**. I just love <strong>bold text</strong>. I just love bold text.
I just love __bold text__. I just love <strong>bold text</strong>. I just love bold text.
Love**is**bold Love<strong>is</strong>bold Loveisbold

Bold Best Practices

Markdown applications don’t agree on how to handle underscores in the middle of a word. For compatibility, use asterisks to bold the middle of a word for emphasis.

  Do this   Don’t do this
Love**is**bold Love__is__bold

Italic

To italicize text, add one asterisk or underscore before and after a word or phrase. To italicize the middle of a word for emphasis, add one asterisk without spaces around the letters.

Markdown HTML Rendered Output
Italicized text is the *cat’s meow*. Italicized text is the <em>cat’s meow</em>. Italicized text is the cat’s meow.
Italicized text is the _cat’s meow_. Italicized text is the <em>cat’s meow</em>. Italicized text is the cat’s meow.
A*cat*meow A<em>cat</em>meow Acatmeow

Italic Best Practices

Markdown applications don’t agree on how to handle underscores in the middle of a word. For compatibility, use asterisks to italicize the middle of a word for emphasis.

  Do this   Don’t do this
A*cat*meow A_cat_meow

Bold and Italic

To emphasize text with bold and italics at the same time, add three asterisks or underscores before and after a word or phrase. To bold and italicize the middle of a word for emphasis, add three asterisks without spaces around the letters.

Markdown HTML Rendered Output
This text is ***really important***. This text is <strong><em>really important</em></strong>. This text is really important.
This text is ___really important___. This text is <strong><em>really important</em></strong>. This text is really important.
This text is __*really important*__. This text is <strong><em>really important</em></strong>. This text is really important.
This text is **_really important_**. This text is <strong><em>really important</em></strong>. This text is really important.
This is really***very***important text. This is really<strong><em>very</em></strong>important text. This is reallyveryimportant text.

Bold and Italic Best Practices

Markdown applications don’t agree on how to handle underscores in the middle of a word. For compatibility, use asterisks to bold and italicize the middle of a word for emphasis. Continue reading “Markdown Syntax”

YAML Syntax

Introduction

YAML is used for configuration files, blueprints, and also in page settings.

YAML is to configuration what markdown is to markup. It’s basically a human-readable structured data format. It is less complex and ungainly than XML or JSON, but provides similar capabilities. It essentially allows you to provide powerful configuration settings, without having to learn a more complex code type like CSS, JavaScript, and PHP.

YAML is built from the ground up to be simple to use. At its core, a YAML file is used to describe data. One of the benefits of using YAML is that the information in a single YAML file can be easily translated to multiple language types.

YAML Basic Rules

There are some rules that YAML has in place to avoid issues related to ambiguity in relation to various languages and editing programs. These rules make it possible for a single YAML file to be interpreted consistently, regardless of which application and/or library is being used to interpret it.

  • YAML files should end in .yaml.
  • YAML is case sensitive.
  • YAML does not allow the use of tabs.

Basic Data Types

YAML excels at working with mappings (hashes / dictionaries), sequences (arrays / lists), and scalars (strings / numbers). While it can be used with most programming languages, it works best with languages that are built around these data structure types. This includes: PHP, Python, Perl, JavaScript, and Ruby.

Scalars

Scalars are a pretty basic concept. They are the strings and numbers that make up the data on the page. A scalar could be a boolean property, like true, integer (number) such as 5, or a string of text, like a sentence or the title of your website.

Scalars are often called variables in programming. If you were making a list of types of animals, they would be the names given to those animals.

Most scalars are unquoted, but if you are typing a string that uses punctuation and other elements that can be confused with YAML syntax (dashes, colons, etc.) you may want to quote this data using single ‘ or double ” quotation marks. Double quotation marks allow you to use escapings to represent ASCII and Unicode characters.

integer: 25
string: "25"
float: 25.0
boolean: true

TIP: Words true, false, null, ~ and dates have special meaning in YAML. Please quote them if you do not want to use them as a boolean, null or datetime type. Same is true with version numbers, they should be quoted to separate them from float values.

Sequences

Here is a simple sequence you. It is a basic list with each item in the list placed in its own line with an opening dash.

- Cat
- Dog
- Goldfish

This sequence places each item in the list at the same level. If you want to create a nested sequence with items and sub-items, you can do so by placing a single space before each dash in the sub-items. YAML uses spaces, NOT tabs, for indentation. You can see an example of this below. Continue reading “YAML Syntax”

ProviewR – An open source process control

可能是市场上唯一能够以真正的面向对象方式设计和编程的开源过程控制系统。Powered By SSAB.

General

ProviewR is an Open Source Process Control System. It is modern, powerful and general and contains all functions normally required for successful sequential control, adjustment, data acquisition, communication, supervision, etc.

The configuration of a ProviewR system is done graphically, making the application adaptation simple, reliable, and flexible. ProviewR is a distributed system, which means that the system can consist of several computers, connected via a network, preferably ethernet. A typical ProviewR system consists of one process control system and one or more operator stations. It is easy to configure one operating station to become the HMI-system of several control systems.

Programming is possible both with a graphical PLC-editor and with high level programming languages (such as C, C++, Java or FORTRAN). The concept of Proview is based on a soft-PLC solution which runs on standard computers with Linux as operating system.

Performance

The great advantage of using standard hardware and soft-PLC is that system size, properties and performance is mainly limited by the hosting operating system and its hardware. In Proview there are no limits in number of I/O, PID loops, PLC programs, counters etc. The minimum cycle time for a PLC loop is less than 1 ms.

Communication

ProviewR can communicate with other computers both via ethernet network (ip) and via serial mechanisms. ProviewR supports several different protocols, such as UDP or TCP sockets via ethernet and Siemens 3964R on serial links.

I/O system

The most common used I/O system in Proview is Profibus/DP, a robust and well-tested field bus. There are also support for Profinet, Ethernet Powerlink, Modbus TCP and RTU, PSS9000, 1-wire, some USB I/O cards etc. The Modular design of the I/O system and the fact that ProviewR is based on Linux and high level languages makes it easy to implement other I/O systems with available drivers or develop new ones.

Object Orientation

ProviewR is the only control system on the market that can work in a truly object oriented way. Programming can be made in a traditional way with simple function blocks and simple signals. ProviewR though has support for creating complex objects and function objects that work upon them.

Object oriented concepts such as inheritance, methods and aggregates are supported.

Open Source

ProviewR is probably the first Open Source system for process control in the world. Originally developed in Sweden by Mandator and SSAB Oxelösund as a process control system based on standard computers, the system has become a fully-fledged, integrated and low-cost solution that is running on standard PC’s with Linux operating system.

ProviewR is Open Source and the license is GNU/GPL. You can download ProviewR, use it, modify it and redistribute it as much as you like as long as you follow the license terms.

Official site:

www.proview.se

Source Codes:

https://sourceforge.net/projects/proview/files/proview/

https://github.com/siamect/proview


老生常谈,TCP三次握手、四次挥手过程及原理

本文来自于互联网,原始出处已无法考证

TCP 协议简述

TCP 提供面向有连接的通信传输,面向有连接是指在传送数据之前必须先建立连接,数据传送完成后要释放连接。
无论哪一方向另一方发送数据之前,都必须先在双方之间建立一条连接。在TCP/IP协议中,TCP协议提供可靠的连接服务,连接是通过三次握手进行初始化的。
同时由于TCP协议是一种面向连接的、可靠的、基于字节流的运输层通信协议,TCP是全双工模式,所以需要四次挥手关闭连接。

TCP包首部

网络中传输的数据包由两部分组成:一部分是协议所要用到的首部,另一部分是上一层传过来的数据。首部的结构由协议的具体规范详细定义。在数据包的首部,明确标明了协议应该如何读取数据。反过来说,看到首部,也就能够了解该协议必要的信息以及所要处理的数据。包首部就像协议的脸。

所以我们在学习TCP协议之前,首先要知道TCP在网络传输中处于哪个位置,以及它的协议的规范,下面我们就看看TCP首部的网络传输起到的作用:

下面的图是TCP头部的规范定义,它定义了TCP协议如何读取和解析数据:

TCP首部承载这TCP协议需要的各项信息,下面我们来分析一下: Continue reading “老生常谈,TCP三次握手、四次挥手过程及原理”

Visual Studio Code的设计亮点

本文转自网络,原文网址 https://zhuanlan.zhihu.com/p/35303567

Visual Studio Code(VS Code)近年来获得了爆炸式增长,成为广大开发者工具库中的必备神器。它作为一个开源项目,也吸引了无数第三方开发者和终端用户,成为顶尖开源项目之一。它在功能上做到了够用,体验上做到了好用,更在拥有海量插件的情况下做到了简洁流畅,实属难能可贵。

我是VS Code用户,同时也为它开发插件,插件市场里的众多Java插件基本都是我们团队的作品,所以我在日常工作中观察到不少VS Code在工程方面的亮点,下面就来逐一探讨。

简洁而聚焦的产品定位,贯穿始终

你知道VS Code的开发团队人数不多吗?难以相信吧,大家都觉得VS Code无所不能,如此强大的工具那么几个人怎么做得出来。实际上功能丰富是个美好的错觉,因为大部分针对特定编程语言和技术的功能都是第三方插件提供的,VS Code的核心始终非常精简,这很考验产品团队的拿捏能力:做多了,臃肿,人手也不够;做少了,太弱,没人用。他们团队选择了专注于核心功能的开发,为用户提供简洁流畅的体验,并将该思路贯穿在产品开发的每个环节。在我看来,这就是第一个亮点。 Continue reading “Visual Studio Code的设计亮点”

Application Pool Identities

Introduction

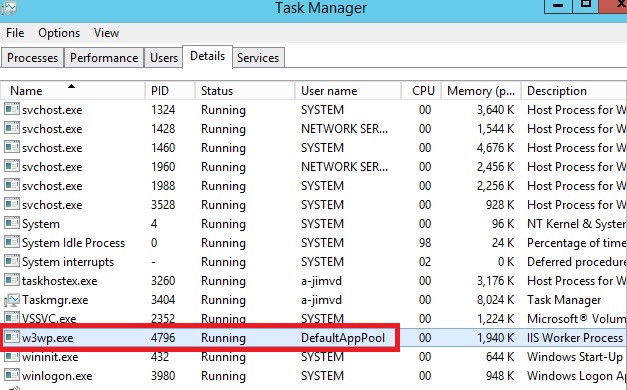
Whether you are running your site on your own server or in the cloud, security must be at the top of your priority list. If so, you will be happy to hear that IIS has a security feature called the application pool identity. This feature was introduced in Service Pack 2 (SP2) of Windows Server 2008 and Windows Vista. An application pool identity allows you to run an application pool under a unique account without having to create and manage domain or local accounts. The name of the application pool account corresponds to the name of the application pool. The image below shows an IIS worker process (W3wp.exe) running as the DefaultAppPool identity.

Application Pool Identity Accounts

Worker processes in IIS 6.0 and in IIS 7 run as Network Service by default. Network Service is a built-in Windows identity. It doesn’t require a password and has only user privileges; that is, it is relatively low-privileged. Running as a low-privileged account is a good security practice because then a software bug can’t be used by a malicious user to take over the whole system.

However, a problem arose over time as more and more Windows system services started to run as Network Service. This is because services running as Network Service can tamper with other services that run under the same identity. Because IIS worker processes run third-party code by default (Classic ASP, ASP.NET, PHP code), it was time to isolate IIS worker processes from other Windows system services and run IIS worker processes under unique identities. The Windows operating system provides a feature called “virtual accounts” that allows IIS to create a unique identity for each of its application pools. Click here for more information about Virtual Accounts. Continue reading “Application Pool Identities”

Windows PowerShell Quick Reference

How to Access Arguments

To access command-line arguments used when starting a script use the automatic variable $args. You can cycle through the individual arguments in the $args collection by using code similar to this:

foreach ($i in $args) {$i}

To access a particular argument use the collection index number, with 0 representing the first item in the collection, 1 representing the second item, etc:

$args[0]

You can reference the last item in a collection by using the index number –1:

$args[-1]

How to Use Colored Text

To display text in a different color use the Write-Host cmdlet and specify a foreground color:

How to Get More Information

You can also specify a different background color: Continue reading “Windows PowerShell Quick Reference”