Kubernetes PV, PVC, Storage Class, and Provisioner

Before diving into the world of Kubernetes, let’s take a look at what Kubernetes was built on – Docker.

Docker is famous for its simplicity and ease of use. That’s what made Docker popular and became the foundation of Kubernetes. A Docker container is stateless and fast. It can be destroyed and recreated without paying much of a price. But it’s hard to live a meaningful life with amnesia. No matter if it’s your database, your key-value store, or just some raw data. Everyone needs persistent storage.

It’s straightforward to create persistent storage in Docker. In the early versions, the user can use -v to create either a new anonymous undetermined sized empty volume or a bind-mount to a directory on the host. During those days, there was no third party interface allowing you to hook into Docker directly, though it could be easily worked around by bind-mounting the directory which had already been mounted by storage vendor on the host. In August 2015, Docker released v1.8, which officially introduced the volume plugin to allow third-parties to hook up their storage solutions. The installed volume plugin would be called by Docker to create/delete/mount/umount/get/list related volumes. And each volume would have a name. That’s it. The framework of the volume plugin remains largely the same till this day.

Persistent Volume and Persistent Volume Claim

When you try to figure out how to create persistent storage in Kubernetes, the first two concepts you will likely encounter are Persistent Volume (PV), and Persistent Volume Claim (PVC).

So, what are they? Which one of the two works like the volume in Docker?

In fact, neither works like the volume in Docker. In addition to PV and PVC, there is also a Volume concept in Kubernetes, but it’s not like the one in Docker. We will talk about it later.

After you read a bit more about PV and PVC, you would likely realize that PV is the allocated storage and PVC is the request to use that storage. If you have some experiences previously with cloud computing or storage, you would likely think PV is a storage pool and PVC is a volume which would be carved out from the storage pool.

But no, that’s not what PV and PVC are. In Kubernetes, one PV maps to one PVC, and vice versa. It’s one to one mapping exclusively.

I’ve explained those multiple times to people with extensive experience with storage and cloud computing. They almost always scratch their heads after, and cannot make sense of it.

I can’t make sense of it either when I encountered those two concepts for the first time.

Let’s quote the definition of PV and PVC here:

A PersistentVolume (PV) is a piece of storage in the cluster that has been provisioned by an administrator. It is a resource in the cluster just like a node is a cluster resource. PVs are volume plugins like Volumes but have a lifecycle independent of any individual pod that uses the PV. This API object captures the details of the implementation of the storage, be that NFS, iSCSI, or a cloud-provider-specific storage system.

A PersistentVolumeClaim (PVC) is a request for storage by a user. It is similar to a pod. Pods consume node resources and PVCs consume PV resources. Pods can request specific levels of resources (CPU and Memory). Claims can request specific size and access modes (e.g., can be mounted once read/write or many times read-only).

The keywords you need to pay attention to here are by an administrator and by a user.

In short, Kubernetes separates the basic unit of storage into two concepts. PV is a piece of storage which supposed to be pre-allocated by an admin. And PVC is a request for a piece of storage by a user.

It said that Kubernetes expects the admin to allocate various sized PVs beforehand. When the user creates PVC to request a piece of storage, Kubernetes will try to match that PVC with a pre-allocated PV. If a match can be found, the PVC will be bound to the PV, and the user will start to use that pre-allocated piece of storage.

This is different from the traditional approach, in which the admin is not responsible for allocating every piece of storage. The admin just needs to give the user permission to access a certain storage pool, and decide what’s the quota for the user, then leave the user to carve out the needed pieces of the storage from the storage pool.

But in Kubernetes’s design, PV has already been carved out from the storage pool, waiting to be matched with PVC. The user can only request the pre-allocated, fixed-size pieces of storage. This results in two things:

  1. If the user only needs a 1 GiB volume, but the smallest PV available is 1 TiB, the user would have to use that 1 TiB volume. Later, the 1 TiB volume won’t be available to any other users, who are probably going to need much more than 1 GiB. This would not only cause the waste of the storage space, but also would result in a situation where some workloads cannot be started due to the resource constraint, while other workloads are using excessive amounts of resources that they don’t need.
  2. In order to alleviate the first issue, the administrator either needs to constantly communicate with the user regarding what size/performance of the storage the user needs at the time of the workload creation, or predict the demand and pre-allocate the PV accordingly.

As a result, it’s hard to enforce the separate of allocation (PV) and usage (PVC). In the real world, I don’t see people using PV and PVC as the way they were designed for. Most likely admins quickly give up the power of creating PV and delegate it to users. Since PV and PVC are still one to one binding, the existence of PVC become unnecessary.

So in my opinion, the use case PV and PVC designed for is “uncommon”, to say the least.

I hope someone with more Kubernetes history background can chip in here, to help me understand why Kubernetes is designed in this way. Continue reading “Kubernetes PV, PVC, Storage Class, and Provisioner”

Front-end client communication

The article is from Microsoft.

In a cloud-native system, front-end clients (mobile, web, and desktop applications) require a communication channel to interact with independent back-end microservices.

What are the options?

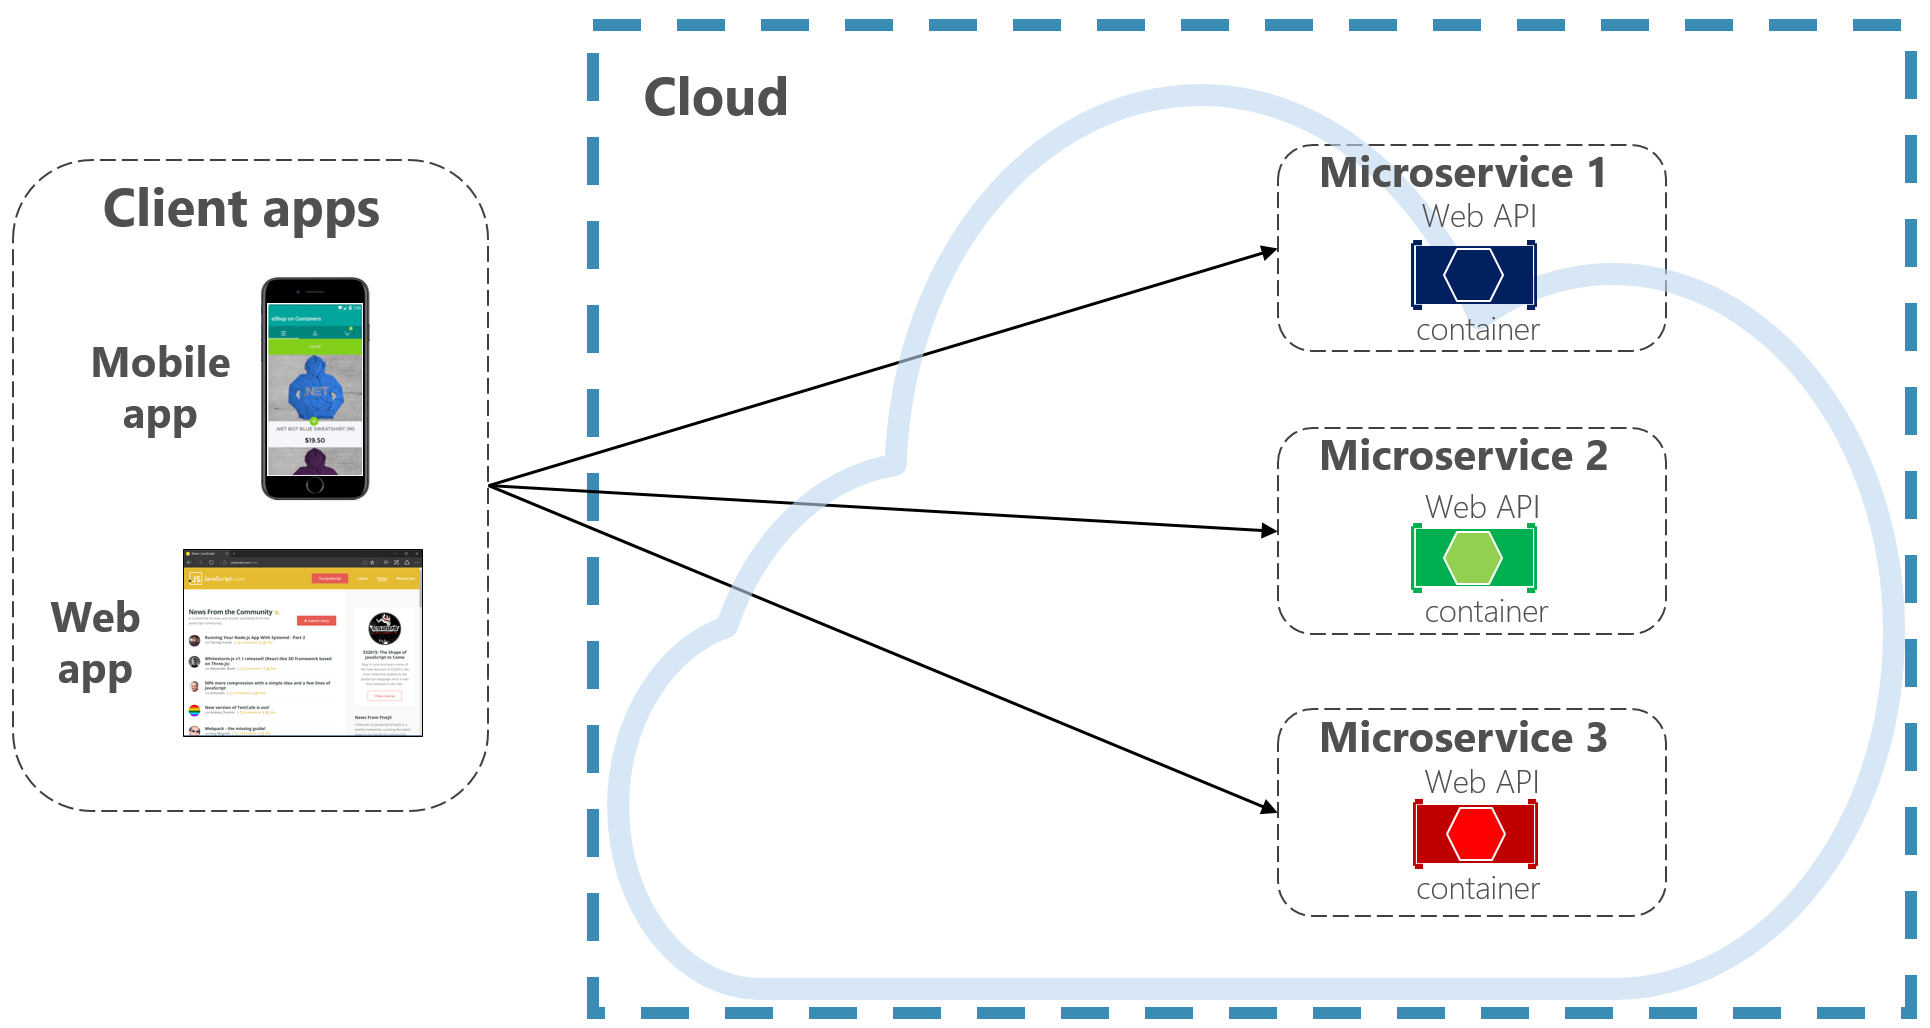
To keep things simple, a front-end client could directly communicate with the back-end microservices, shown in Figure 4-2.

Direct client to service communication

Figure 4-2. Direct client to service communication

With this approach, each microservice has a public endpoint that is accessible by front-end clients. In a production environment, you’d place a load balancer in front of the microservices, routing traffic proportionately.

While simple to implement, direct client communication would be acceptable only for simple microservice applications. This pattern tightly couples front-end clients to core back-end services, opening the door for a number of problems, including:

  • Client susceptibility to back-end service refactoring.
  • A wider attack surface as core back-end services are directly exposed.
  • Duplication of cross-cutting concerns across each microservice.
  • Overly complex client code – clients must keep track of multiple endpoints and handle failures in a resilient way.

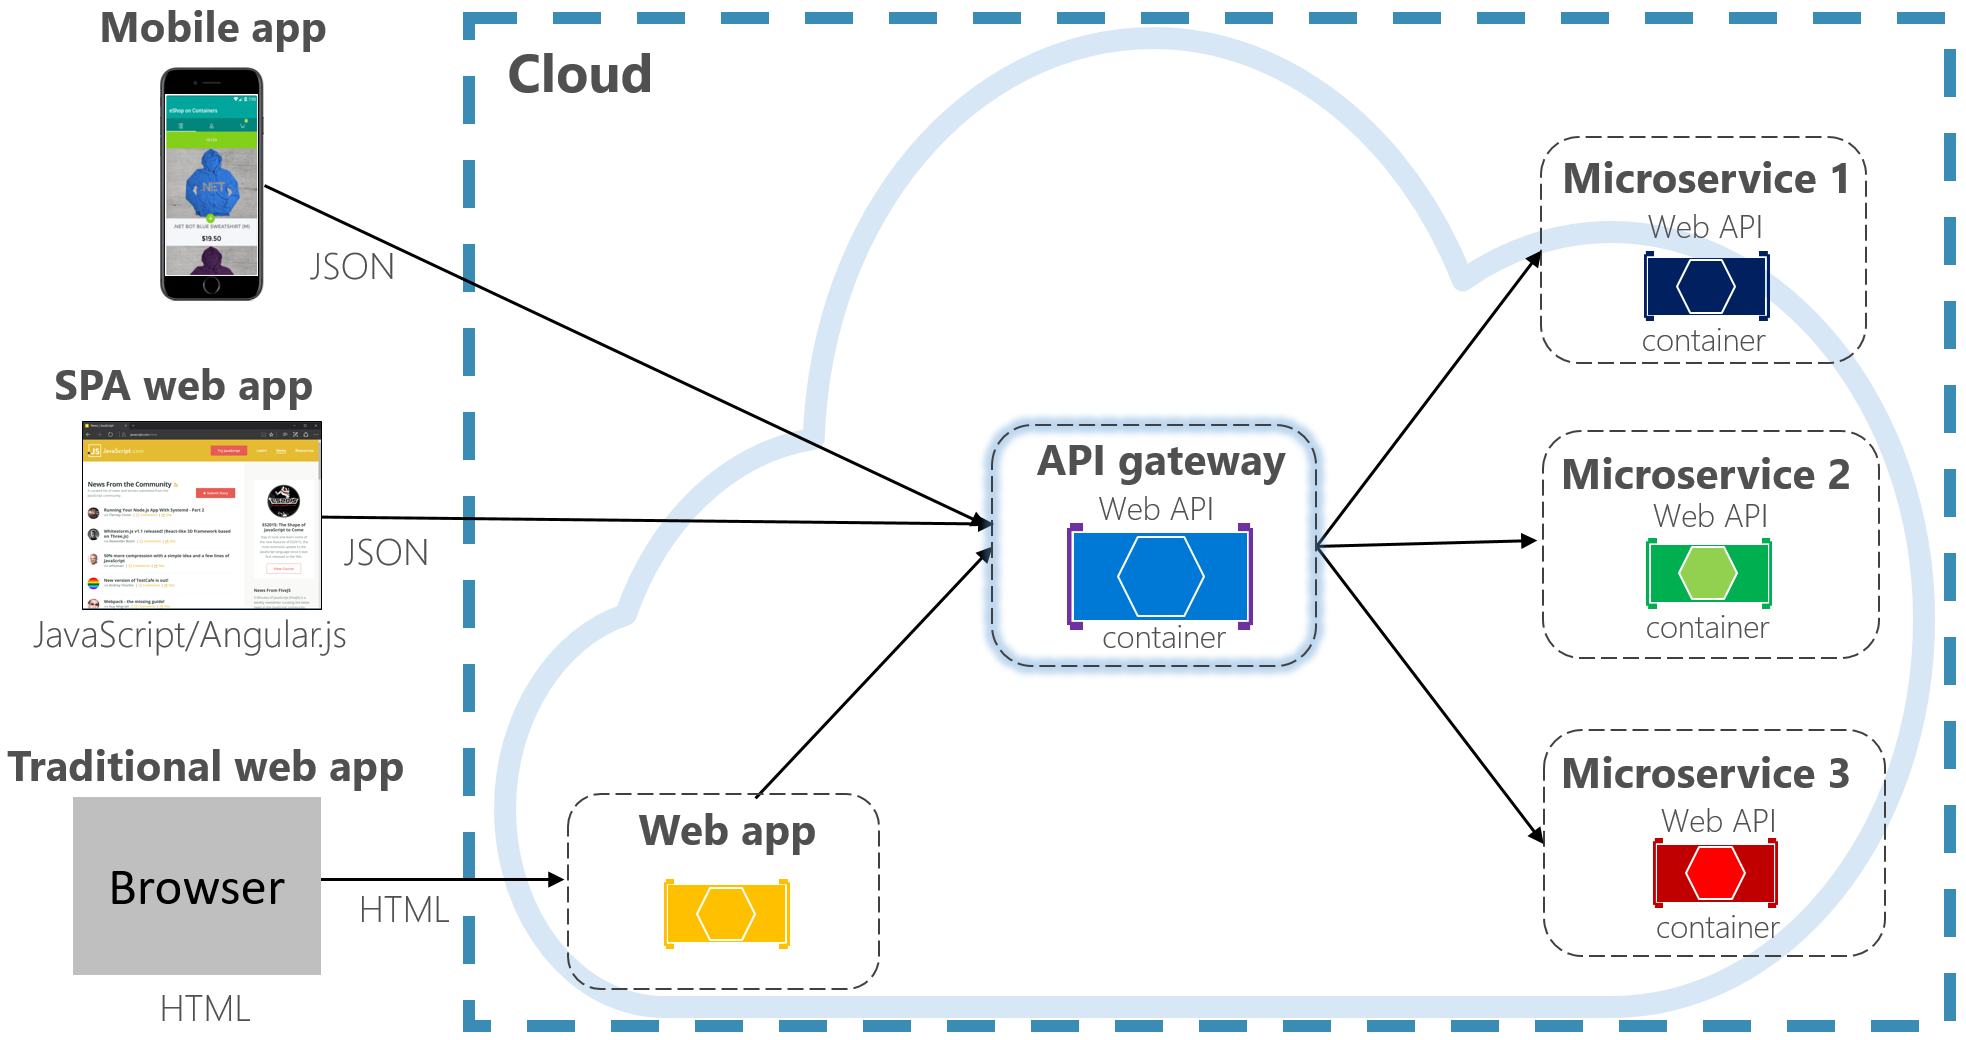
Instead, a widely accepted cloud design pattern is to implement an API Gateway Service between the front-end applications and back-end services. The pattern is shown in Figure 4-3.

API Gateway Pattern Continue reading “Front-end client communication”

Cloud Native

The article is from Microsoft.

Stop what you’re doing and text ten of your colleagues. Ask them to define the term “Cloud Native”. Good chance you’ll get ten different answers.

Cloud native is all about changing the way you think about constructing critical business systems.

Cloud-native systems are designed to embrace rapid change, large scale, and resilience.

The Cloud Native Computing Foundation provides an official definition:

Cloud-native technologies empower organizations to build and run scalable applications in modern, dynamic environments such as public, private, and hybrid clouds. Containers, service meshes, microservices, immutable infrastructure, and declarative APIs exemplify this approach.

These techniques enable loosely coupled systems that are resilient, manageable, and observable. Combined with robust automation, they allow engineers to make high-impact changes frequently and predictably with minimal toil.

Applications have become increasingly complex with users demanding more and more. Users expect rapid responsiveness, innovative features, and zero downtime. Performance problems, recurring errors, and the inability to move fast are no longer acceptable. They’ll easily move to your competitor.

Cloud native is about speed and agility. Business systems are evolving from enabling business capabilities to being weapons of strategic transformation that accelerate business velocity and growth. It’s imperative to get ideas to market immediately.

Here are some companies who have implemented these techniques. Think about the speed, agility, and scalability they’ve achieved.

Table 1
Company Experience
Netflix Has 600+ services in production. Deploys hundred times per day.
Uber Has 1,000+ services in production. Deploys several thousand times each week.
WeChat Has 3,000+ services in production. Deploys 1,000 times a day.

As you can see, Netflix, Uber, and WeChat expose systems that consist of hundreds of independent microservices. This architectural style enables them to rapidly respond to market conditions. They can instantaneously update small areas of a live, complex application, and individually scale those areas as needed.

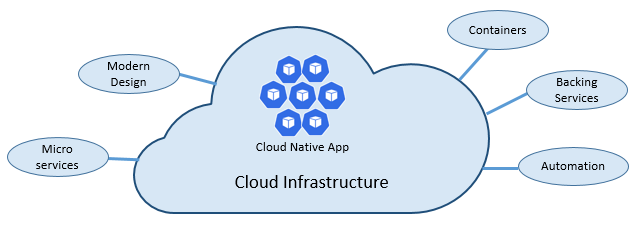
The speed and agility of cloud native come about from a number of factors. Foremost is cloud infrastructure. Five additional foundational pillars shown in Figure 1-3 also provide the bedrock for cloud-native systems.

Cloud-native foundational pillars Continue reading “Cloud Native”

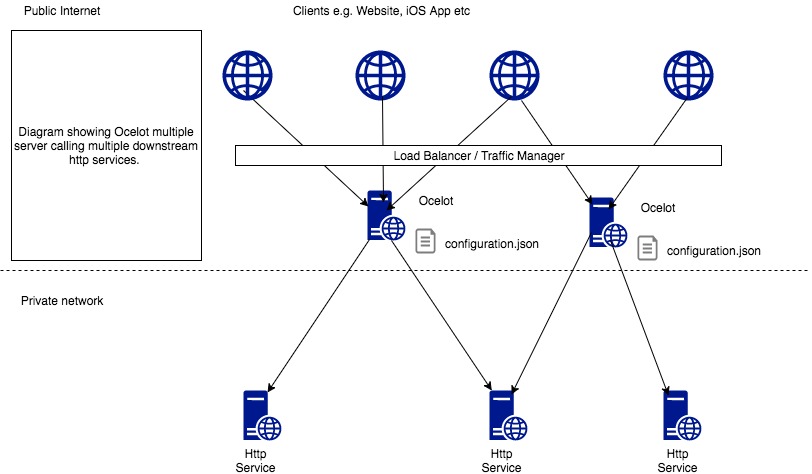
ocelot brief

The article copyed from https://ocelot.readthedocs.io

Ocelot is aimed at people using .NET running a micro services / service orientated architecture that need a unified point of entry into their system.

In particular I want easy integration with IdentityServer reference and bearer tokens.

Ocelot is a bunch of middlewares in a specific order.

Ocelot manipulates the HttpRequest object into a state specified by its configuration until it reaches a request builder middleware where it creates a HttpRequestMessage object which is used to make a request to a downstream service. The middleware that makes the request is the last thing in the Ocelot pipeline. It does not call the next middleware. There is a piece of middleware that maps the HttpResponseMessage onto the HttpResponse object and that is returned to the client. That is basically it with a bunch of other features.

The following are configurations that you use when deploying Ocelot.

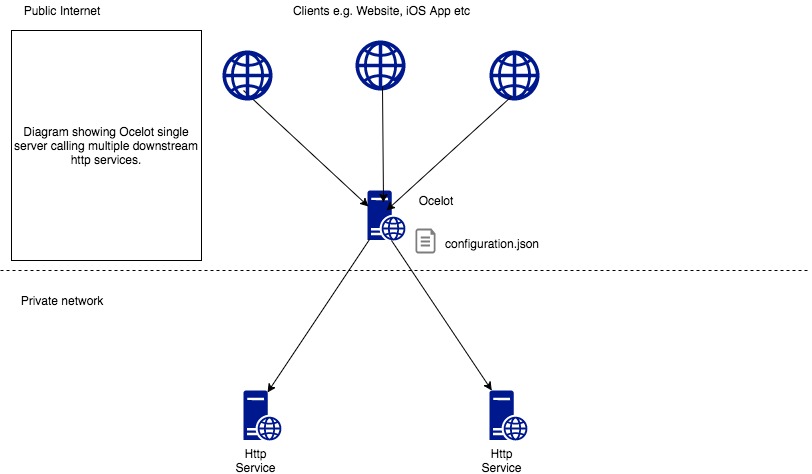
Basic Implementation

../_images/OcelotBasic.jpg

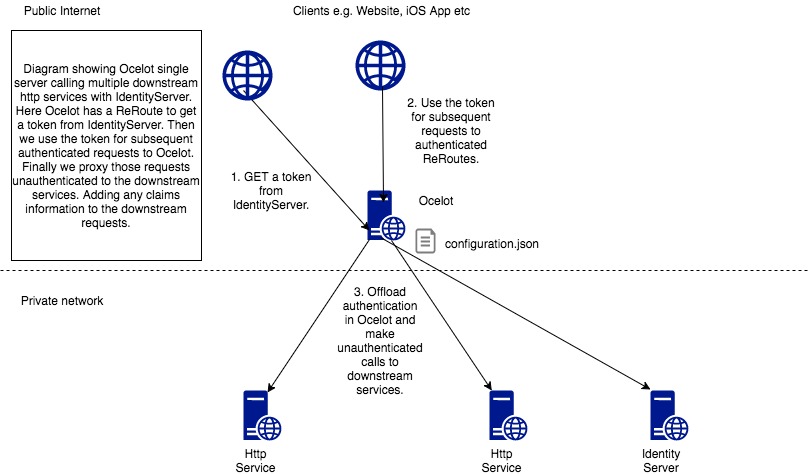
With IdentityServer

../_images/OcelotIndentityServer.jpg

Multiple Instances

../_images/OcelotMultipleInstances.jpg

Continue reading “ocelot brief”

浅谈Docker swarm+HAProxy/Nginx

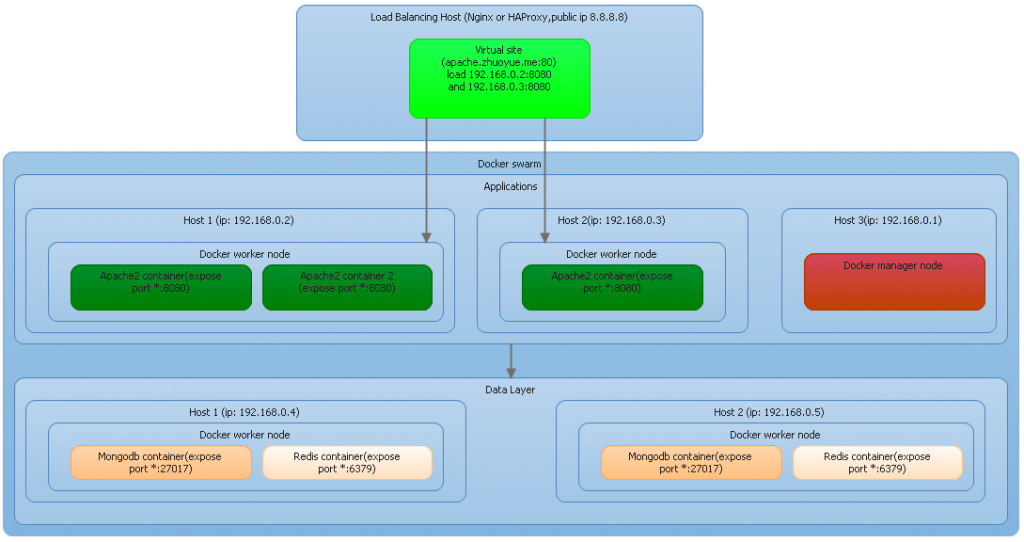
就不废话了,直接画出系统逻辑架构图:docker-arch

这里有些问题简单交待一下:

  1. HAProxy/Nginx作为External network的入口
  2. Docker swarm是Internal network,不对外公开
  3. HAProxy/Nginx在配置Load Balance时,每个Server的定义仍然使用的是各Docker work nodes的IP地址(最大的提高性能),在Nginx中类似于下面的配置片断:
    upstream apache2{
    server 192.168.0.2:8080;
    server 192.168.0.3:8080;
    }
    
    server{
    listen 80;
    server_name apache.zhuoyue.me;
    location /{
    proxy_pass http://apache2;
    }
    }
  4. Docker swarm也有自己的Load Balance和Health check功能和规则,在上一项的描述中,我们也可以在Nginx中不去指定upstream,而让swarm去进行load balancing,那么在nginx就可以这样配置:
    server{
    listen 80;
    server_name apache.zhuoyue.me;
    location /{
    proxy_pass http://192.168.0.2:8080;
    }
    }

    但这种配置有一个缺点:那就是192.168.0.2这台host上的docker process不能halt。

  5. 那么整个docker swarm创建过程可能是这样的:
    1. 在docker manager node上创建了一个task:
      docker service create --name apache2 --publish 8080:80 --replicas 3 apache2

      我们创建了一个名为apache2的task,通过定义replicas=3创建了总计3个image name为apache2的containers, 并且它们暴露8080 port,用以映射container内部的apache httpd 的80端口

    2. 该service task被分配在2个work nodes上运行(IP地址分别为192.168.0.2, 192.168.0.3,其中192.168.0.2上会运行着2个container)
    3. 因为某不知名原因192.168.0.2中的2个apache2 container 都被halt,比如执行了命令
      docker stop containername

      然而在halt之前你是可以使用192.168.0.2:8080访问apache2

    4. 此时你以为无法再继续使用192.168.0.2:8080访问apache2了,但事实并非如此,因为worker node工作在swarm模式下,192.168.0.2:8080请求会被docker swarm ingress路由到一个可用的contianer上继续执行(192.168.0.3:8080),并且它不同于重定向,响应IP地址仍然是192.168.0.2:8080)

Install docker on Ubuntu

所在的Team最近要面向微服务做一些创新,于是开始学习起Micro Service,在行业中,针对Micro Service有很多实现,我比较关注Docker,因为它覆盖的面比较广,各方面的需求它都会相应的解决方案,另外就是安装配置也比较简单。这篇文件摘自Docker官方站点,告诉大家怎么在Ubuntu上安装Docker(PS. 原本我是想在Windows上安装Docker的,可是Docker for Windows只supports win 10,无奈只能在win7 pro上通过virtual box+ubuntu trusty lts来实现安装docker,刚好之前做Hadoop分享的时候,已经安装了vitual box+ubuntu)。

原文 地址 https://docs.docker.com/engine/installation/linux/ubuntulinux/

Install Docker on Ubuntu

Docker is supported on these Ubuntu operating systems:

  • Ubuntu Xenial 16.04 (LTS)
  • Ubuntu Wily 15.10
  • Ubuntu Trusty 14.04 (LTS)
  • Ubuntu Precise 12.04 (LTS)

This page instructs you to install using Docker-managed release packages and installation mechanisms. Using these packages ensures you get the latest official release of Docker. If you are required to install using Ubuntu-managed packages, consult the Ubuntu documentation. Continue reading “Install docker on Ubuntu”