This document aims to provide organized content about how to build a OData V4 service using ASP.NET Web API for OData. It’s more than just a getting started guidance and is more systematic than the samples.
Version
This is the first version of this document written in April, 2015.
Targetted audience
This document fits best the readers who has a relative good knowledge of OData (e.g. knowing the OData primitive and structured types, knowing the basic OData URL conventions, knowing the basic OData features such as operations, queries and so on) and would like to explore how some advanced scenarios can be implemented using Web API for OData.
Beginners to OData or Web API for OData can also leverage this document as a structured way to learn. But it’s strongly recommended to read the Getting Started tutorials on OData.org to get a grasp of OData concepts before reading this doc.
This document also assumes that the readers know how to create projects in Visual Studio and know how to install packages using the Nuget Package Manager. It also assumes they have knowledge in C# programming and are not unfamiliar with concepts like classes, properties, methods, and so on.
Structure of this document
This document starts with a tutorial about how a simplest OData V4 service can be written using ASP.NET Web API for OData. Then it steps into the section about how OData models can be built in different ways. After that, OData routing is introduced in details followed by a description of OData feature implementation. Finally, it talks about security and customization of the OData V4 service.
Let’s get started by creating a simple OData V4 service. It has one entity set Products, one entity type Product. Product has two properties ID and Name, with ID being an integer and Name being a string. The service is read only. The only data clients can get besides the service document and metadata document, is the Products entity set.
a. Create the Visual Studio project
In Visual Studio, create a new C# project from the ASP.NET Web Application template. Name the project “ODataService”.
In the New Project dialog, select the Empty template. Under “Add folders and core references…”, click Web API. Click OK.
b. Install the OData packages
In the Nuget Package Manager, install Microsoft.AspNet.OData and all it’s dependencies.
c. Add a model class
Add a C# class to the Models folder:
namespace ODataService.Models
{
    public class Product
    {
        public int ID { get; set; }
        public string Name { get; set; }
    }
}
d. Add a controller class
Add a C# class to the Controllers folder:
namespace ODataService.Controllers
{
    public class ProductsController : ODataController
    {
        private List<Product> products = new List<Product>()
        {
            new Product()
            {
                ID = 1,
                Name = "Bread",
            }
        };

        public List<Product> Get()
        {
            return products;
        }
    }
}
In the controller, we defined a List<Product> object which has one product element. It’s considered as a in-memory storage of the data of the OData service.
We also defined a Get method that returns the list of products. The method refers to the handling of HTTP GET requests. We’ll cover that in the sections about routing.
e. Configure the OData Endpoint
Open the file App_Start/WebApiConfig.cs. Replace the existing Register method with the following code:
public static void Register(HttpConfiguration config)
{
    var builder = new ODataConventionModelBuilder();

    builder.EntitySet<Product>("Products");

    config.MapODataServiceRoute("ODataRoute", null, builder.GetEdmModel());
}
f. Start the OData service
Start the OData service by running the project and open a browser to consume it. You should be able to get access to the service document at http://host/service/ in which http://host/service/ is the root path of your service. The metadata document can be accessed at GET http://host/service/$metadata and the products at GET http://host/service/Products.
OData stands for the Open Data Protocol. It was initiated by Microsoft and is now an ISO and OASIS standard. OData enables the creation and consumption of RESTful APIs, which allow resources, defined in a data model and identified by using URLs, to be published and edited by Web clients using simple HTTP requests.RESTier is a RESTful API development framework for building standardized, OData V4 based RESTful services on .NET platform. It can be seen as a middle-ware on top of Web API OData. RESTier provides facilities to bootstrap an OData service like what WCF Data Services (which is sunset) does, beside this, it supports to add business logic in several simple steps, has flexibility and easy customization like what Web API OData do. It also supports to add additional publishers to support other protocols and additional providers to support other data sources.
For more information about OData, please refer to the following resources:
After RESTier 0.4.0, creating an OData service has never been easier! This subsection shows how to create an OData V4 endpoint using RESTier in a few minutes. AdventureWorksLT will be used as the sample database and Entity Framework as the data proxy.
Create a project and a web app
1.Open Visual Studio 2015 or Visual Studio 2013. If you use Visual Studio 2013, the screens will be slightly different from the screenshots, but the procedures are essentially the same.
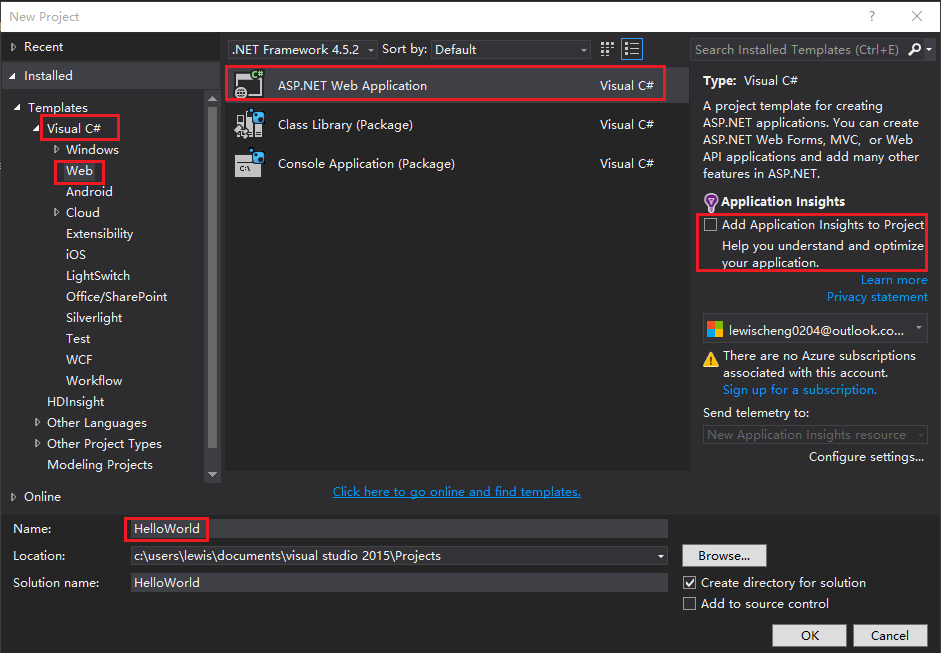
2.From the File menu, click New > Project.
3.In the New Project dialog box, click C# > Web > ASP.NET Web Application.
4.Clear the Add Application Insights to Project check box.
5.Name the application HelloWorld.
6.Click OK.
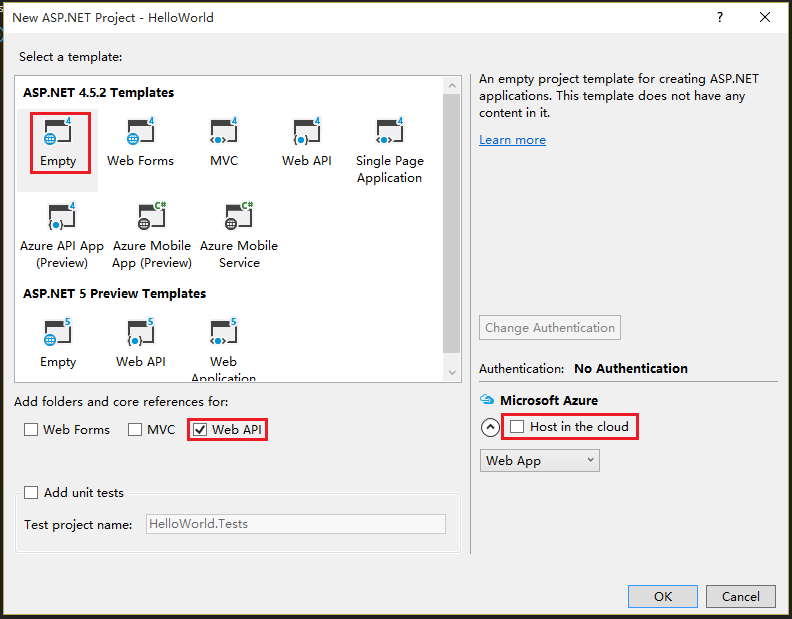
7.In the New ASP.NET Project dialog box, select the Empty template.
8.Select the Web API check box.
9.Clear the Host in the cloud check box.
Install the RESTier packages
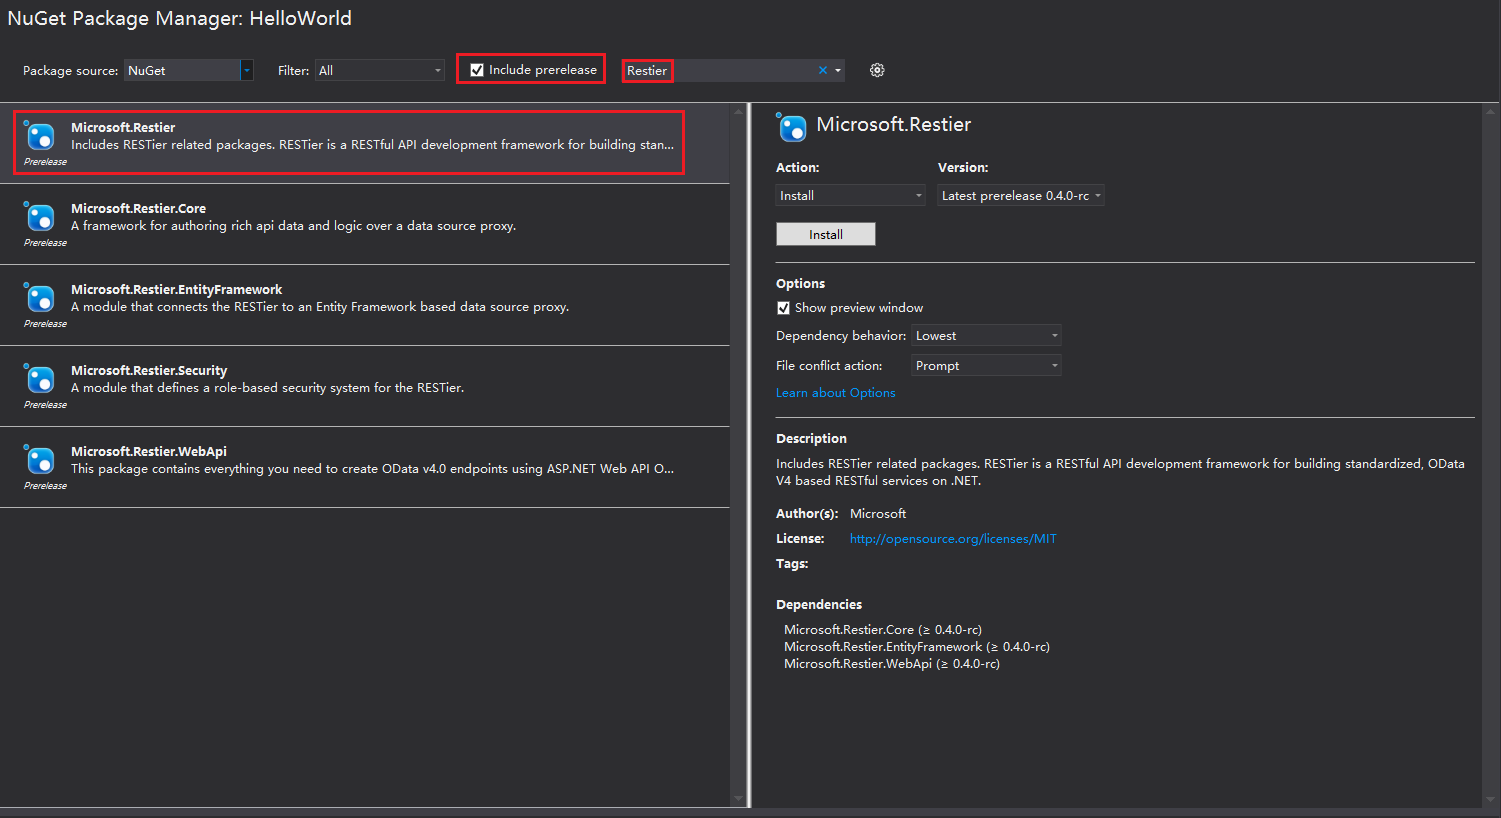
1.In the Solution Explorer window, right click the project HelloWorld and select Manage NuGet Packages….
2.In the NuGet Package Manager window, select the Include prerelease checkbox.
3.Type Restier in the Search Box beside and press Enter.
4.Select Microsoft.Restier and click the Install button.
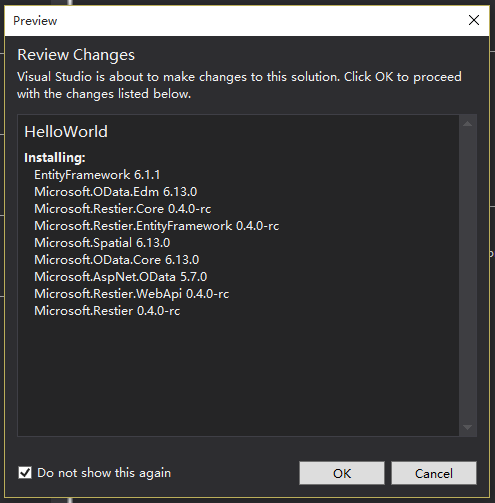
5.In the Preview dialog box, click the OK button.
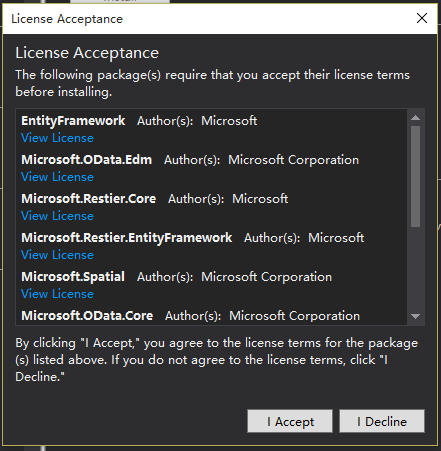
6.In the License Acceptance dialog box, click the I Accept button.
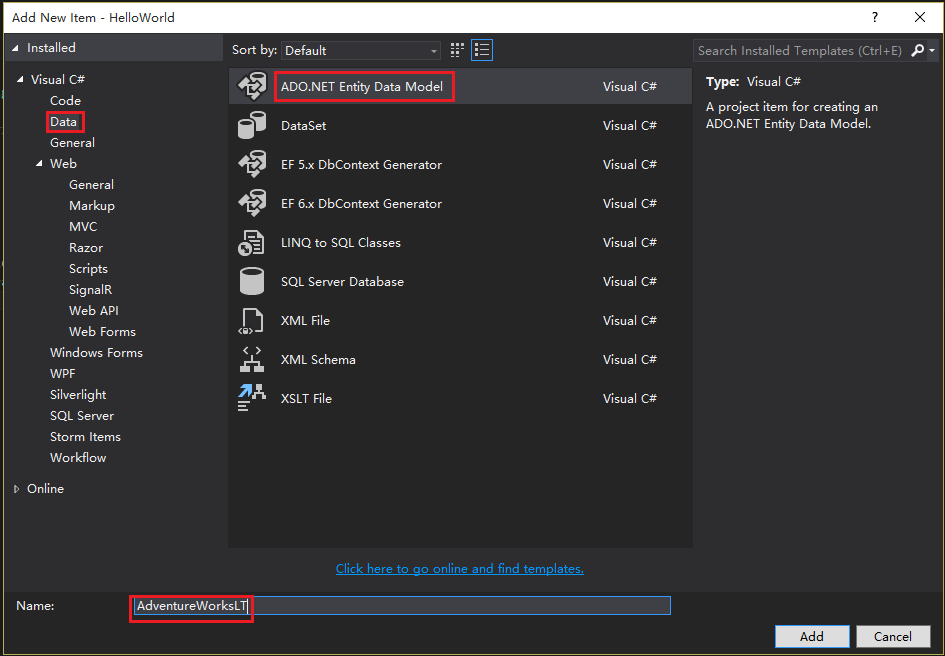
2.In the Solution Explorer window, right click the Models folder under the project HelloWorld and select Add > New Item.
3.In the Add New Item – HelloWorld dialog box, click C# > Data > ADO.NET Entity Data Model.
4.Name the model AdventureWorksLT.
5.Click the Add button.
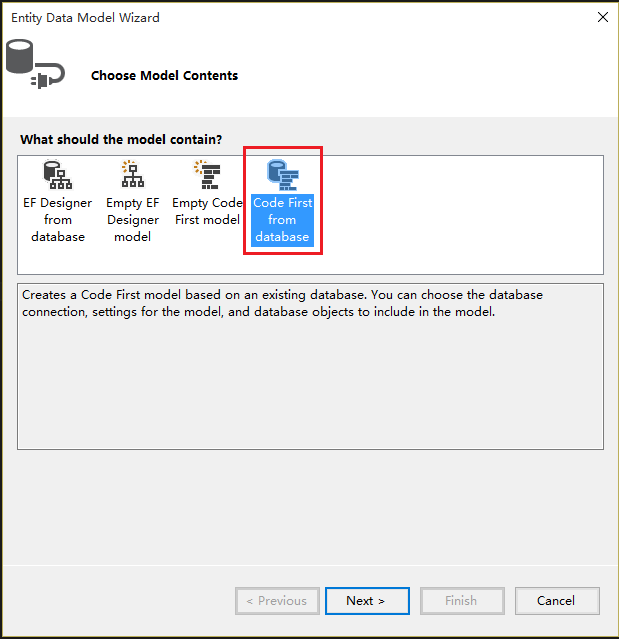
6.In the Entity Data Model Wizard window, select the item Code First from database.
7.Click the Next button.
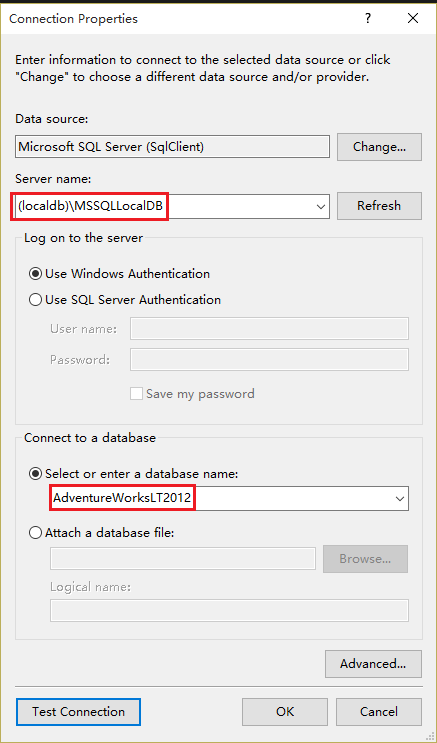
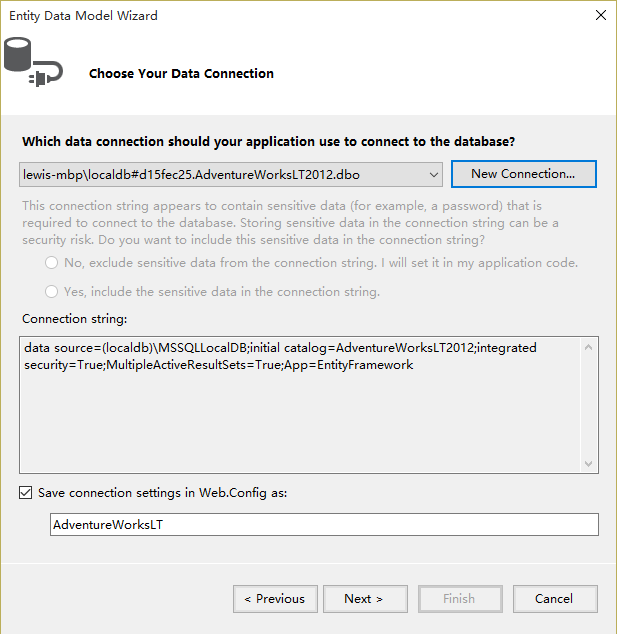
8.Click the New Connection button.
9.In the Connection Properties dialog box, type (localdb)MSSQLLocalDB for Server name.
10.Select AdventureWorksLT2012 for database name.
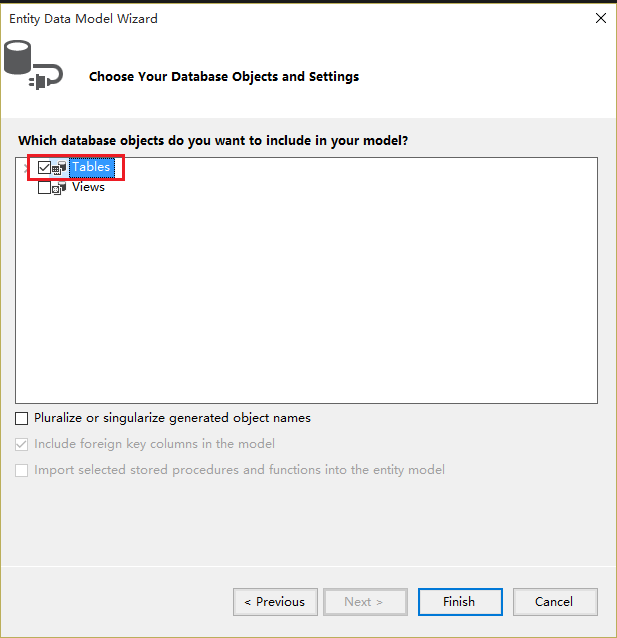
11.After returning to the Entity Data Model Wizard window, click the Next button.
12.Select the Tables check box and click the Finish button.
Configure the OData Endpoint
In the Solution Explorer window, click HelloWorld > App_Start > WebApiConfig.cs. Replace the WebApiConfig class the following code.
namespace HelloWorld
{
    public static class WebApiConfig
    {
        public async static void Register(HttpConfiguration config)
        {
            // enable query options for all properties
            config.Filter().Expand().Select().OrderBy().MaxTop(null).Count();
            await config.MapRestierRoute<EntityFrameworkApi<AdventureWorksLT>>(
                "AdventureWorksLT",
                "api/AdventureWorksLT",
                new RestierBatchHandler(GlobalConfiguration.DefaultServer));
        }
    }
}
Note : DbApi was renamed to EntityFrameworkApi from version 0.5.
The configuration “config.Filter().Expand().Select().OrderBy().MaxTop(null).Count();” is enabling filter/expand/select/orderby/count on all properties, starting 1.0 release, there are more smaller granularity control on the properties which can be used in query option, and all properties are disabled to be used by default. User can add configured in CLR class or during model build to configure which properties are allowed to be used in filter/expand/select/orderby/count. Refer to Model bound document for more details.
After these steps, you will have finished bootstrapping an OData service endpoint. You can then Run the project and an OData service is started. Then you can start by accessing the URL http://localhost:<ISS Express port>/api/AdventureWorksLT to view all available entity sets, and try with other basic OData CRUD operations. For instance, you may try querying any of the entity sets using the $select, $filter, $orderby, $top, $skip or $apply query string parameters.
There are several kinds of OData payload, includes service document, model metadata, feed, entry, entity references(s), complex value(s), primitive value(s). OData Core library is designed to write and read all these payloads.We’ll go through each kind of payload here. But first, we’ll set up the neccessary code that is common to all kind of payload.Class ODataMessageWriter is the entrance class to write the OData Payload.To construct an ODataMessageWriter instance, you’ll need to provide an IODataResponseMessage, or IODataRequestMessage, depends on if you are writing a response or a request.OData Core library provides no implementation of these two interfaces, because it is different in different scenario.In this tutoria, we’ll use the InMemoryMessage.cs.
We’ll use the model set up in the EDMLIB section.
IEdmModel model = builder
                .BuildAddressType()
                .BuildCategoryType()
                .BuildCustomerType()
                .BuildDefaultContainer()
                .BuildCustomerSet()
                .GetModel();
Then set up the message to write the payload.
MemoryStream stream = new MemoryStream();
InMemoryMessage message = new InMemoryMessage() {Stream = stream};
Create the settings:
ODataMessageWriterSettings settings = new ODataMessageWriterSettings();
Now we are ready to create the ODataMessageWriter instance:
ODataMessageWriter writer = new ODataMessageWriter((IODataResponseMessage) message, settings, model);
After we write the payload, we can inspect into the memory stream wrapped in InMemoryMessage to check what is written.
Here is the whole program that use SampleModelBuilder and InMemoryMessage to write metadata payload:
IEdmModel model = builder
                .BuildAddressType()
                .BuildCategoryType()
                .BuildCustomerType()
                .BuildDefaultContainer()
                .BuildCustomerSet()
                .GetModel();

            MemoryStream stream = new MemoryStream();
            InMemoryMessage message = new InMemoryMessage() {Stream = stream};

            ODataMessageWriterSettings settings = new ODataMessageWriterSettings();

            ODataMessageWriter writer = new ODataMessageWriter((IODataResponseMessage) message, settings, model);
            writer.WriteMetadataDocument();

            string output =Encoding.UTF8.GetString(stream.ToArray());
            Console.WriteLine(output);
Now we’ll go through on each kind of payload.
Write metadata
Write metadata is simple, just use WriteMetadataDocument method in ODataMessageWriter.
writer.WriteMetadataDocument();
Please be noticed that this API only works when: 1. Writting response message, that means when constructing the ODataMessageWriter, you mut supply IODataRequestMessage. 2. A model is supplied when constructing ODataMessageWriter.
So the following two examples won’t work.
ODataMessageWriter writer = new ODataMessageWriter((IODataRequestMessage) message, settings, model);
            writer.WriteMetadataDocument();
ODataMessageWriter writer = new ODataMessageWriter((IODataResponseMessage) message);
            writer.WriteMetadataDocument();
Write service document
To write a service document, first create a ODataServiceDocument instance, which will contains all the neccessary information in a service document, that include, entity set, singleton and function import.
In this example, we create a service document that contains two entity sets, one singleton and one function import.
ODataServiceDocument serviceDocument = new ODataServiceDocument();
            serviceDocument.EntitySets = new []
            {
                new ODataEntitySetInfo
                {
                    Name = "Customers",
                    Title = "Customers",
                    Url = new Uri("Customers", UriKind.Relative),
                },
                new ODataEntitySetInfo
                {
                    Name = "Orders",
                    Title = "Orders",
                    Url = new Uri("Orders", UriKind.Relative),
                },
            };

            serviceDocument.Singletons = new[]
            {
                new ODataSingletonInfo
                {
                    Name = "Company",
                    Title = "Company",
                    Url = new Uri("Company", UriKind.Relative),
                },
            };

            serviceDocument.FunctionImports = new[]
            {
                new ODataFunctionImportInfo
                {
                    Name = "GetOutOfDateOrders",
                    Title = "GetOutOfDateOrders",
                    Url = new Uri("GetOutOfDateOrders", UriKind.Relative),
                },
            };
Then let’s call WriteServiceDocument method to write it.
writer.WriteServiceDocument(serviceDocument);
However, this would not work. An ODataException will threw up said that “The ServiceRoot property in ODataMessageWriterSettings.ODataUri must be set when writing a payload.” This is because a valid service document will contains a context url reference to the metadata url, which need to be told in ODataMessageWriterSettings.
This service root informaiton is provided in ODataUri.ServiceRoot, as this code shows.
ODataMessageWriterSettings settings = new ODataMessageWriterSettings();
            settings.ODataUri = new ODataUri()
            {
                ServiceRoot = new Uri("http://services.odata.org/V4/OData/OData.svc/")
            };

            ODataMessageWriter writer = new ODataMessageWriter((IODataResponseMessage) message, settings);
writer.WriteServiceDocument(serviceDocument);
As you can see, you don’t need to provide model to write service document.
It is a little work to instantiate the service document instance and set up the entity sets, singletons and function imports. Actually, the EdmLib provided a useful API which can generate a service document instance from model. The API is named GenerateServiceDocument, and defined as an extension method on IEdmModel.
All the entity sets, singletons and function imports whose IncludeInServiceDocument attribute is set to true in the model will be in the generated service document. And according to the spec, only those function import without any parameter should set its IncludeInServiceDocument attribute to true.
And as WriteMetadata API, WriteServiceDocument works only when it is writing a response message.
Besides API WriteServiceDocument, there is another API called WriteServiceDocumentAsync in ODataMessageWriter class. It is an async version of WriteServiceDocument, so you can call it in async way.
A lot of API in writer and reader provides async version of API, they all work as a async complement of the API that without Async suffix.
Write Feed
Collection of entities is called feed in OData Core Library. Unlike metadata or service document, you must create another writer on ODatMessageWriter to write the feed. The library is designed to write feed in an streaming way, which means the entry is written one by one.
Feed is represented by ODataFeed class. To write a feed, following information are needed: 1. The service root, which is defined by ODataUri. 2. The model, as construct parameter of ODataMessageWriter. 3. Entity set and entity type information.
Here is how to write an empty feed.
ODataMessageWriterSettings settings = new ODataMessageWriterSettings();
            settings.ODataUri = new ODataUri()
            {
                ServiceRoot = new Uri("http://services.odata.org/V4/OData/OData.svc/")
            };

            ODataMessageWriter writer = new ODataMessageWriter((IODataResponseMessage)message, settings, model);

            IEdmEntitySet entitySet = model.FindDeclaredEntitySet("Customers");
            ODataWriter odataWriter = writer.CreateODataFeedWriter(entitySet);

            ODataFeed feed = new ODataFeed();
            odataWriter.WriteStart(feed);
            odataWriter.WriteEnd();
Line 4 give the service root, line 6 give the model, and line 10 give the entity set and entity type information.
The output contains a context url in the output, which is based on the service root you provided in ODataUri, and the entity set name. There is also a value which is an empty collection, where will hold the entities if there is any.
There is another way to provide the entity set and entity type information, through ODataFeedAndEntrySerializationInfo, and in this no model is needed.
ODataMessageWriterSettings settings = new ODataMessageWriterSettings();
            settings.ODataUri = new ODataUri()
            {
                ServiceRoot = new Uri("http://services.odata.org/V4/OData/OData.svc/")
            };

            ODataMessageWriter writer = new ODataMessageWriter((IODataResponseMessage)message, settings);

            ODataWriter odataWriter = writer.CreateODataFeedWriter();

            ODataFeed feed = new ODataFeed();

            feed.SetSerializationInfo(new ODataFeedAndEntrySerializationInfo()
            {
                NavigationSourceName = "Customers",
                NavigationSourceEntityTypeName = "Customer"
            });
            odataWriter.WriteStart(feed);
            odataWriter.WriteEnd();
When writting feed, you can provide a next page, which is used in server driven paging.
ODataFeed feed = new ODataFeed();
            feed.NextPageLink = new Uri("Customers?next", UriKind.Relative);
            odataWriter.WriteStart(feed);
            odataWriter.WriteEnd();
The output will contains a next link before the value collection.
The reader API is almost like the writer API, so you can expect the symmetry here.First, we’ll set up the neccessary code that is common to all kind of payload.Class ODataMessageReader is the entrance class to read the OData Payload.To construct an ODataMessageReader instance, you’ll need to provide an IODataResponseMessage, or IODataRequestMessage, depends on if you are reading a response or a request.OData Core library provides no implementation of these two interfaces, because it is different in different scenario.In this tutoria, we’ll still use the InMemoryMessage.cs.
We’ll still use the model set up in the EDMLIB section.
IEdmModel model = builder
                .BuildAddressType()
                .BuildCategoryType()
                .BuildCustomerType()
                .BuildDefaultContainer()
                .BuildCustomerSet()
                .GetModel();
Then set up the message to read the payload.
MemoryStream stream = new MemoryStream();
InMemoryMessage message = new InMemoryMessage() {Stream = stream};
Create the settings:
ODataMessageReaderSettings settings = new ODataMessageReaderSettings();
Now we are ready to create the ODataMessageReader instance:
ODataMessageReader reader = new ODataMessageReader((IODataResponseMessage) message, settings);
We’ll use the code in the first part to write the payload, and in this section use the reader to read the payload. After write the payload, we should set the Position of MemoryStream to zero.
stream.Position = 0;
Here is the whole program that use SampleModelBuilder and InMemoryMessage to first write then read metadata payload:
IEdmModel model = builder
                .BuildAddressType()
                .BuildCategoryType()
                .BuildOrderType()
                .BuildCustomerType()
                .BuildDefaultContainer()
                .BuildOrderSet()
                .BuildCustomerSet()
                .GetModel();

            MemoryStream stream = new MemoryStream();
            InMemoryMessage message = new InMemoryMessage() { Stream = stream };

            ODataMessageWriterSettings writerSettings = new ODataMessageWriterSettings();

            ODataMessageWriter writer = new ODataMessageWriter((IODataResponseMessage)message, writerSettings, model);

            writer.WriteMetadataDocument();
            stream.Position = 0;

            ODataMessageReaderSettings settings = new ODataMessageReaderSettings();

            ODataMessageReader reader = new ODataMessageReader((IODataResponseMessage)message, settings);

            IEdmModel modelFromReader = reader.ReadMetadataDocument();
Now we’ll go through on each kind of payload.
Read metadata
Read metadata is simple, just use ReadMetadataDocument method in ODataMessageReader.
reader.ReadMetadataDocument();
Just like writing metadata, this API only works when reading response message, that means when constructing the ODataMessageReader, you must supply IODataResponseMessage.
Read service document
Read service document is through the ReadServiceDocument API.
ODataMessageReaderSettings readerSettings = new ODataMessageReaderSettings();

            ODataMessageReader reader = new ODataMessageReader((IODataResponseMessage)message, readerSettings, model);

            ODataServiceDocument serviceDocumentFromReader = reader.ReadServiceDocument();
And as ReadMetadata API, ReadServiceDocument works only when it is reading a response message.
Besides API ReadServiceDocument, there is another API called ReadServiceDocumentAsync in ODataMessageReader class. It is an async version of ReadServiceDocument, so you can call it in async way.
To read a feed, you must create another reader on ODataFeedReader to read the feed. The library is designed to read feed in an streaming way, which means the entry is read one by one.
Here is how to read a feed.
ODataMessageReader reader = new ODataMessageReader((IODataResponseMessage)message, readerSettings, model);
            ODataReader feedReader = reader.CreateODataFeedReader(entitySet, entitySet.EntityType());
            while (feedReader.Read())
            {
                switch (feedReader.State)
                {
                    case ODataReaderState.FeedEnd:
                        ODataFeed feedFromReader = (ODataFeed)feedReader.Item;
                        break;
                    case ODataReaderState.EntryEnd:
                        ODataEntry entryFromReader = (ODataEntry)feedReader.Item;
                        break;
                }
            }
Read Entry
To read a top level entry, use ODataMessageReader.CreateEntryReader. Other than that, there is no different compared to read feed.
ODataMessageReader reader = new ODataMessageReader((IODataResponseMessage)message, readerSettings, model);
            ODataReader feedReader = reader.CreateODataEntryReader(entitySet, entitySet.EntityType());
            while (feedReader.Read())
            {
                switch (feedReader.State)
                {
                    case ODataReaderState.FeedEnd:
                        ODataFeed feedFromReader = (ODataFeed)feedReader.Item;
                        break;
                    case ODataReaderState.EntryEnd:
                        ODataEntry entryFromReader = (ODataEntry)feedReader.Item;
                        break;
                }
            }
1.3 Use ODataUriParser
This post is intended to guide you through the UriParser for OData V4, which is released within ODataLib V6.0 and later.You may have already read the following posts about OData UriParser in ODataLib V5.x:
The main reference document for UriParser is the URL Conventions specification. The ODataUriParser class is its main implementation in ODataLib.
The ODataUriParser class has two main functionalities:
Parse resource path
Parse query options
We’ve also introduced the new ODataQueryOptionParser class in ODataLib 6.2+, in case you do not have the full resource path and only want to parse the query options only. The ODataQueryOptionParser shares the same API signature for parsing query options, you can find more information below.
Using ODataUriParser
The use of ODataUriParser class is easy and straightforward, as we mentioned, we do not support static methods now, we will begin from creating an ODataUriParser instance.
ODataUriParser has only one constructor:
public ODataUriParser(IEdmModel model, Uri serviceRoot, Uri fullUri);
Parameters:
model is the Edm model the UriParser will refer to; serviceRoot is the base Uri for the service, which could be a constant for certain service. Note that serviceRoot must be an absolute Uri; fullUri is the full request Uri including query options. When it is an absolute Uri, it must be based on the serviceRoot, or it can be a relative Uri. In the following demo we will use the model from OData V4 demo service , and create an ODataUriParser instance.
Uri serviceRoot = new Uri("http://services.odata.org/V4/OData/OData.svc");
IEdmModel model = EdmxReader.Parse(XmlReader.Create(serviceRoot + "/$metadata"));
Uri fullUri = new Uri("http://services.odata.org/V4/OData/OData.svc/Products");
ODataUriParser parser = new ODataUriParser(model, serviceRoot, fullUri);
Parsing Resource Path
You can use the following API to parse resource path:
Uri fullUri = new Uri("http://services.odata.org/V4/OData/OData.svc/Products(1)");
ODataUriParser parser = new ODataUriParser(model, serviceRoot, fullUri);
ODataPath path = parser.ParsePath();
You don’t need to pass in resource path as parameter here, because the constructor has taken the full Uri.
The ODataPath holds the enumeration of path segments for resource path. All path segments are represented by classes derived from ODataPathSegment.
In our demo, the resource Path in the full Uri is Products(1), then the result ODataPath would contain two segments: one EntitySetSegment for EntitySet named Products, and the other KeySegment for key with integer value “1” .
Parsing Query Options
ODataUriParser supports parsing following query options: $select, $expand, $filter, $orderby, $search, $top, $skip, and $count.
For the first five, the parsing result is an instance of class XXXClause, which represents the query option as an Abstract Syntax Tree (with semantic information bound). Note that $select and $expand query options are merged together in one SelectExpandClause class. The latter three all have primitive type value, and the parsing result is the corresponding primitive type wrapped by Nullable class.
For all query option parsing results, the Null value indicates the corresponding query option is not specified in the request URL.
Here is a demo for parsing the Uri with all kinds of query options (please notice that value of skip would be null as it is not specified in the request Uri) :
The data structure for SelectExpandClause, FilterClause, OrdeyByClause have already been presented in the two previous articles mentioned at the top of this post. Here I’d like to talk about the newly introduced SearchClause.
SearchClause contains tree representation of the $search query. The detailed rule of $search query option can be found here. In general, the search query string can contain search terms combined with logic keywords: AND, OR and NOT.
All search terms are represented by SearchTermNode, which is derived from SingleValueNode. SearchTermNode has one property named Text, which contains the original word or phrases.
SearchClause’s Expression property holds the tree structure for $search. If the $search contains single word, the Expression would be set to that SearchTermNode. But when $search is a combination of various term and logic keywords, the Expression would also contains nested BinaryOperatorNode and UnaryOperatorNode.
For example, if the query option $search has the value “a AND b”, the result expression (syntax tree) would have the following structure:
SearchQueryOption
    Expression = BinaryOperatorNode
                   OperationKind = BinaryOperatorKind.And
                   Left           = SearchTermNode
                                    Text = a
                   Right          = SearchTermNode
                                    Text = b
Using ODataQueryOption Parser
There may be some cases that you already know the query context information but does not have the full request Uri. The ODataUriParser does not seems to be available as it will always require the full Uri, then the user would have to fake one.
In ODataLib 6.2 we shipped a new Uri parser that targets at query options only, it requires the model and type information be provided through its constructor, then it could be used for query options parsing as same as ODataUriParser.
The constructor looks like this:
public ODataQueryOptionParser(IEdmModel model, IEdmType targetEdmType, IEdmNavigationSource targetNavigationSource, IDictionary<string, string> queryOptions);
Parameters (here the target object indicates what resource path was addressed, see spec):
model is the model the UriParser will refer to; targetEdmType is the type query options apply to, it is the type of target object; targetNavigationSource is the EntitySet or Singleton where the target comes from, it is usually the NavigationSource of the target object; queryOptions is the dictionary containing the key-value pairs for query options.
Here is the demo for its usage, it is almost the same as the ODataUriParser:
大概五个月前,我们需要将框架里的重要组件通过RESTful API的形式暴露出来,当时我们进行了技术选型,在.Net平台 下,毋庸置疑,我们选择了Asp.Net Web API。不过在实现的过程中,我们又进行了筛选,一种说法是使用原生的Web API框架,另一种说法是使用Web API OData Framework(会多出学习成本)。最终我们决定还是使用原生的Web API框架。不过后来,由于对OData比较感兴趣,私下里我又对其进行了一些了解。在这里,我将官方的一些目录贴出来,供备案。
Getting started
OData is an OASIS standard for creating and consuming RESTful APIs. The OData .NET libraries help users to build and consume OData v4 services.
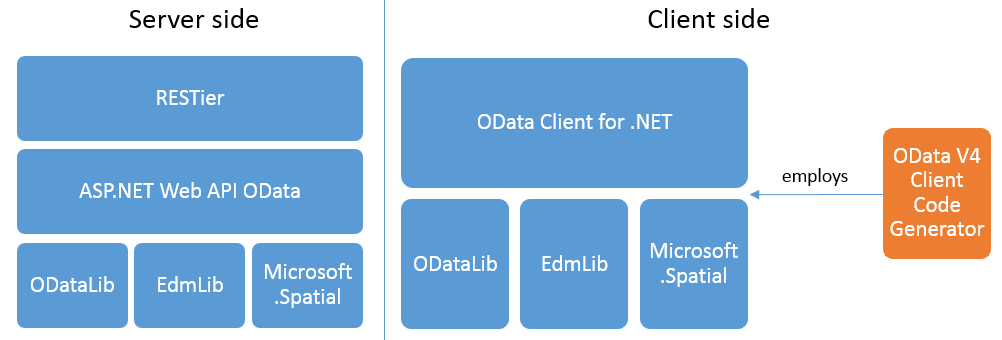
ODataLib, namespace Microsoft.OData.Core. It contains classes to serialize, deserialize and validate OData JSON payloads (source code | binary | tutorial).
EdmLib, namespace Microsoft.OData.Edm. It contains classes to represent, construct, parse, serialize and validate entity data models (source code | binary | tutorial).
Microsoft.Spatial, namespace Microsoft.Spatial. It contains classes and methods that facilitate geography and geometry spatial operations (source code | binary | tutorial).
Web API OData, namespace System.Web.OData. It contains everything you need to create OData v4.0 endpoints using ASP.NET Web API and to support OData query syntax for your web APIs (source code | binary | tutorial).
RESTier, namespace Microsoft.Restier. RESTier is a RESTful API development framework for building standardized, OData V4 based RESTful services on .NET platform. It can be seen as a middle-ware on top of Web API OData. RESTier provides facilities to bootstrap an OData service like what WCF Data Services (which is sunset) does, beside this, it supports to add business logic in several simple steps, has flexibily and easy customization like what Web API OData do. It also supports to add additional publishers to support other protocols and additional providers to support other data sources. It is currently a preview version (source code | binary | tutorial).
OData Client for .NET, namespace Microsoft.OData.Client. It contains LINQ-enabled client APIs for issuing OData queries and consuming OData JSON payloads (source code | binary | tutorial).
Tooling
OData Client Code Generator. An item template that simplifies the process of accessing OData v4 services by generating C# and VB.Net client-side proxy classes. It works with Visual Studio 2010, 2012, 2013 and 2015. (download | tutorial).
OData Connected Service. An item template that simplifies the process of accessing OData v3 and v4 services by generating C# client-side proxy classes. It works with Visual Studio 2015 only. (download | tutorial).
//
// GET: /Movies/Details/5
public ActionResult Details(Int32 id)
{
    Movie movie = db.Movies.Find(id);
    if (movie == null)
    {
        return HttpNotFound();
    }
    return View(movie);
}
Code First 通过使用Find方法找到要显示的Movie对象。如果movie对象为null,则返回HttpNotFound(),这个判断非常有必要,试想如果有黑客要攻击你的网站,他们可能将通过修改URL来尝试访问你的网站,例如将http://localhost:xxxx/Movies/Details/1 修改为http://localhost:xxxx/Movies/Details/12345 。如果你不去验证movie是否为空,则会将数据库错误返回给黑客,这样会暴漏网站的更多信息。
Delete 和 DeleteConfirm 方法
//
// GET: /Movies/Delete/5
public ActionResult Delete(Int32 id)
{
    Movie movie = db.Movies.Find(id);
    if (movie == null)
    {
        return HttpNotFound();
    }
    return View(movie);
}

//
// POST: /Movies/Delete/5
[HttpPost, ActionName("Delete")]
[ValidateAntiForgeryToken]
public ActionResult DeleteConfirmed(Int32 id)
{
    Movie movie = db.Movies.Find(id);
    db.Movies.Remove(movie);
    db.SaveChanges();
    return RedirectToAction("Index");
}
public ActionResult Delete(FormCollection fcNotUsed, int id = 0)
{
    Movie movie = db.Movies.Find(id);
    if (movie == null)
    {
        return HttpNotFound();
    }
    db.Movies.Remove(movie);
    db.SaveChanges();
    return RedirectToAction("Index");
}
在本节中,我们将使用Entity Framework Code First 数据迁移功能将模型类的改变应用到数据库中。
默认情况下,当我们使用Entity Framework Code First 自动创建一个数据库,像我们之前教程中讲的那样,Code First 添加一个table帮我们跟踪数据库结构是否与模型类同步。如果不同步,Entity Framework 将抛出一个错误,这样更方便我们在开发的时候发现问题,否则只能在运行时通过晦涩的错误来查找了。
Start by updating the Index action method to the existing MoviesController class. Here’s the code:
首先,我们需要更新 MoviesController 的 Index 方法,代码如下:
代码清单1:更新后的Index方法 – MoviesController.cs
public ActionResult Index(string searchString)
{
    var movies = from m in db.Movies
                 select m;

    if (!String.IsNullOrEmpty(searchString))
    {
        movies = movies.Where(s => s.Title.Contains(searchString));
    }

    return View(movies);
}
在本节中,我们继续研究生成的Edit方法和视图。但在研究之前,我们先将 release date 弄得好看一点。打开 ModelsMovie.cs 文件,添加下面黄色背景的行:
代码清单1:ModelsMovie.cs 文件
using System;
using System.ComponentModel.DataAnnotations;
using System.Data.Entity;

namespace MvcMovie.Models
{
    public class Movie
    {
        public int ID { get; set; }
        public string Title { get; set; }
        [Display(Name = "Release Date")]
        [DataType(DataType.Date)]
        public DateTime ReleaseDate { get; set; }
        public string Genre { get; set; }
        public decimal Price { get; set; }
    }

    public class MovieDBContext : DbContext
    {
        public DbSet<Movie> Movies { get; set; }
    }
}