VMware vSphere and open source project OpenStack present two different ways of structuring an infrastructure. In the vSphere vs. OpenStack debate, choosing the right infrastructure for your organization’s data center comes down to your staff’s expertise, your existing infrastructure requirements, your storage setup and whether you can compromise with vSphere Integrated OpenStack.
VSphere is the predominant virtualization software. It encompasses VMware’s server virtualization product suite, including its ESXi hypervisor, vCenter Server, an HTML5-based management interface and other popular virtualization components.
OpenStack is a collection of open source software, providing a cloud framework that enables you to create and manage both public and private cloud infrastructures. Although you can build a cloud computing environment off of a VMware vSphere infrastructure, OpenStack forms a cloud OS that can organize, provision and manage large resource pools. It also comes with many compute, storage, networking, content delivery, security and analytics resources.
To decide between vSphere vs. OpenStack, you must decide whether your organization needs a primarily cloud or virtualized environment, compare vSphere and OpenStack features and capabilities and evaluate the long-term cost of committing to each.
The cloud vs. virtualization debate
To decide between using cloud infrastructure or virtualized infrastructure, first consider the infrastructure your organization already runs. Identify the costs that could arise as a result of altering or exchanging infrastructure styles and consider the expertise of your IT staff.
If you already use VMware, consider extending a VMware facility to support cloud bursting, which creates business continuity and protects your VMware investment while also enabling you to take advantage of the cloud. However, you must understand how to incorporate cloud automation into your IT processes before attempting to introduce cloud bursting.
Many have implemented VMware Integrated OpenStack to get the best of both vSphere and OpenStack. VIO is an OpenStack distribution for companies that want to deploy and manage an OpenStack private cloud atop an existing vSphere infrastructure.
Public cloud prices have also dropped since public cloud first hit the market. Still, you must weigh the cost difference of paying for a monthly cloud subscription versus an upfront fixed-cost purchase of hardware.
VSphere, OpenStack and containers
VMware was late to introduce cloud products compared to other vendors — specifically, OpenStack, its competitor in private cloud deployments. OpenStack sandboxes are common and easy to deploy; however, OpenStack has struggled with managing scale, user friendliness and feature completeness.
Containers have represented a struggle for many vendors, including OpenStack and VMware. The OpenStack community has developed several service modules to run container instances on OpenStack. Certain releases of the platform, such as 2017’s Ocata release, include container management services that enable you to run container orchestrators such as Apache Mesos, Docker and Kubernetes.
In 2019, VMware introduced its Project Pacific initiative to build Kubernetes and container management capabilities natively into vSphere. Earlier initiatives, such as Pivotal Container Service, also focused on incorporating Kubernetes support into vSphere and aimed to simplify Kubernetes deployment and management.
VSphere maps storage to ESXi, where each ESXi host accesses its storage through a logical unit number mapped to a data store. This approach includes a degree of storage management automation, and you can rebalance VMs across a vSphere cluster based on storage capacity and I/O. You can use a number of APIs to enable your hypervisor to direct storage and manage VMs more effectively.
OpenStack environments, on the other hand, require persistent block storage. This approach requires external storage that supports OpenStack’s Cinder API. However, OpenStack does have the direct object storage that VMware vSphere lacks.
With OpenStack, you save on storage infrastructure costs, but it can increase management costs. The reverse is true with vSphere. Consider your organization’s priorities and resource allocation when you think about the storage requirements of vSphere vs. OpenStack.
Compromising with VMware Integrated OpenStack
Many have implemented VMware Integrated OpenStack (VIO) to get the best of both vSphere and OpenStack. VIO is an OpenStack distribution for companies that want to deploy and manage an OpenStack private cloud atop an existing vSphere infrastructure. It provides developers with OpenStack APIs that can access a VMware virtualized infrastructure and has been tested and supported by VMware.
IT managers and experts have praised VIO for combining the maturity of a VMware environment with the agility of OpenStack. It has utilities that can automate patching and upgrading, and it offers critical VMware products, including vSphere, NSX and VSAN, through OpenStack APIs. Most importantly, it eliminates the requirement to have separate platforms for older, legacy applications that remain critical to an organization and for newer, more modern applications.
However, VIO features can be expensive. You can gain access to VIO with a vSphere Enterprise Plus license, but it doesn’t include support. VIO support is purchased on a per-CPU basis. Newer versions of VIO with more support features are more expensive than older versions without such updates.
Nearly all Markdown applications support the basic syntax outlined in John Gruber’s original design document. There are minor variations and discrepancies between Markdown processors, those are noted inline wherever possible.
Headings
To create a heading, add number signs (#) in front of a word or phrase. The number of number signs you use should correspond to the heading level. For example, to create a heading level three (<h3>), use three number signs (e.g., ### My Header).
Markdown
HTML
Rendered Output
# Heading level 1
<h1>Heading level 1</h1>
Heading level 1
## Heading level 2
<h2>Heading level 2</h2>
Heading level 2
### Heading level 3
<h3>Heading level 3</h3>
Heading level 3
#### Heading level 4
<h4>Heading level 4</h4>
Heading level 4
##### Heading level 5
<h5>Heading level 5</h5>
Heading level 5
###### Heading level 6
<h6>Heading level 6</h6>
Heading level 6
Alternate Syntax
Alternatively, on the line below the text, add any number of == characters for heading level 1 or — characters for heading level 2.
Markdown
HTML
Rendered Output
Heading level 1
===============
<h1>Heading level 1</h1>
Heading level 1
Heading level 2
—————
<h2>Heading level 2</h2>
Heading level 2
Heading Best Practices
Markdown applications don’t agree on how to handle a missing space between the number signs (#) and the heading name. For compatibility, always put a space between the number signs and the heading name.
✅ Do this
❌ Don’t do this
# Here’s a Heading
#Here’s a Heading
Paragraphs
To create paragraphs, use a blank line to separate one or more lines of text.
Markdown
HTML
Rendered Output
I really like using Markdown.
I think I’ll use it to format all of my documents from now on.
<p>I really like using Markdown.</p>
<p>I think I’ll use it to format all of my documents from now on.</p>
I really like using Markdown.
I think I’ll use it to format all of my documents from now on.
Paragraph Best Practices
Unless the paragraph is in a list, don’t indent paragraphs with spaces or tabs.
✅ Do this
❌ Don’t do this
Don’t put tabs or spaces in front of your paragraphs.
Keep lines left-aligned like this.
This can result in unexpected formatting problems.
Don’t add tabs or spaces in front of paragraphs.
Line Breaks
To create a line break (<br>), end a line with two or more spaces, and then type return.
Markdown
HTML
Rendered Output
This is the first line.
And this is the second line.
<p>This is the first line.<br>
And this is the second line.</p>
This is the first line.
And this is the second line.
Line Break Best Practices
You can use two or more spaces (commonly referred to as “trailing whitespace”) for line breaks in nearly every Markdown application, but it’s controversial. It’s hard to see trailing whitespace in an editor, and many people accidentally or intentionally put two spaces after every sentence. For this reason, you may want to use something other than trailing whitespace for line breaks. Fortunately, there is another option supported by nearly every Markdown application: the <br> HTML tag.
For compatibility, use trailing white space or the <br> HTML tag at the end of the line.
There are two other options I don’t recommend using. CommonMark and a few other lightweight markup languages let you type a backslash () at the end of the line, but not all Markdown applications support this, so it isn’t a great option from a compatibility perspective. And at least a couple lightweight markup languages don’t require anything at the end of the line — just type return and they’ll create a line break.
✅ Do this
❌ Don’t do this
First line with two spaces after.
And the next line.First line with the HTML tag after.<br>
And the next line.
First line with a backslash after.
And the next line.First line with nothing after.
And the next line.
Emphasis
You can add emphasis by making text bold or italic.
Bold
To bold text, add two asterisks or underscores before and after a word or phrase. To bold the middle of a word for emphasis, add two asterisks without spaces around the letters.
Markdown
HTML
Rendered Output
I just love **bold text**.
I just love <strong>bold text</strong>.
I just love bold text.
I just love __bold text__.
I just love <strong>bold text</strong>.
I just love bold text.
Love**is**bold
Love<strong>is</strong>bold
Loveisbold
Bold Best Practices
Markdown applications don’t agree on how to handle underscores in the middle of a word. For compatibility, use asterisks to bold the middle of a word for emphasis.
✅ Do this
❌ Don’t do this
Love**is**bold
Love__is__bold
Italic
To italicize text, add one asterisk or underscore before and after a word or phrase. To italicize the middle of a word for emphasis, add one asterisk without spaces around the letters.
Markdown
HTML
Rendered Output
Italicized text is the *cat’s meow*.
Italicized text is the <em>cat’s meow</em>.
Italicized text is the cat’s meow.
Italicized text is the _cat’s meow_.
Italicized text is the <em>cat’s meow</em>.
Italicized text is the cat’s meow.
A*cat*meow
A<em>cat</em>meow
Acatmeow
Italic Best Practices
Markdown applications don’t agree on how to handle underscores in the middle of a word. For compatibility, use asterisks to italicize the middle of a word for emphasis.
✅ Do this
❌ Don’t do this
A*cat*meow
A_cat_meow
Bold and Italic
To emphasize text with bold and italics at the same time, add three asterisks or underscores before and after a word or phrase. To bold and italicize the middle of a word for emphasis, add three asterisks without spaces around the letters.
Markdown
HTML
Rendered Output
This text is ***really important***.
This text is <strong><em>really important</em></strong>.
This text is really important.
This text is ___really important___.
This text is <strong><em>really important</em></strong>.
This text is really important.
This text is __*really important*__.
This text is <strong><em>really important</em></strong>.
This text is really important.
This text is **_really important_**.
This text is <strong><em>really important</em></strong>.
This text is really important.
This is really***very***important text.
This is really<strong><em>very</em></strong>important text.
This is reallyveryimportant text.
Bold and Italic Best Practices
Markdown applications don’t agree on how to handle underscores in the middle of a word. For compatibility, use asterisks to bold and italicize the middle of a word for emphasis. Continue reading “Markdown Syntax”
YAML is used for configuration files, blueprints, and also in page settings.
YAML is to configuration what markdown is to markup. It’s basically a human-readable structured data format. It is less complex and ungainly than XML or JSON, but provides similar capabilities. It essentially allows you to provide powerful configuration settings, without having to learn a more complex code type like CSS, JavaScript, and PHP.
YAML is built from the ground up to be simple to use. At its core, a YAML file is used to describe data. One of the benefits of using YAML is that the information in a single YAML file can be easily translated to multiple language types.
YAML Basic Rules
There are some rules that YAML has in place to avoid issues related to ambiguity in relation to various languages and editing programs. These rules make it possible for a single YAML file to be interpreted consistently, regardless of which application and/or library is being used to interpret it.
YAML files should end in .yaml.
YAML is case sensitive.
YAML does not allow the use of tabs.
Basic Data Types
YAML excels at working with mappings (hashes / dictionaries), sequences (arrays / lists), and scalars (strings / numbers). While it can be used with most programming languages, it works best with languages that are built around these data structure types. This includes: PHP, Python, Perl, JavaScript, and Ruby.
Scalars
Scalars are a pretty basic concept. They are the strings and numbers that make up the data on the page. A scalar could be a boolean property, like true, integer (number) such as 5, or a string of text, like a sentence or the title of your website.
Scalars are often called variables in programming. If you were making a list of types of animals, they would be the names given to those animals.
Most scalars are unquoted, but if you are typing a string that uses punctuation and other elements that can be confused with YAML syntax (dashes, colons, etc.) you may want to quote this data using single ‘ or double ” quotation marks. Double quotation marks allow you to use escapings to represent ASCII and Unicode characters.
TIP: Words true, false, null, ~ and dates have special meaning in YAML. Please quote them if you do not want to use them as a boolean, null or datetime type. Same is true with version numbers, they should be quoted to separate them from float values.
Sequences
Here is a simple sequence you. It is a basic list with each item in the list placed in its own line with an opening dash.
- Cat
- Dog
- Goldfish
This sequence places each item in the list at the same level. If you want to create a nested sequence with items and sub-items, you can do so by placing a single space before each dash in the sub-items. YAML uses spaces, NOT tabs, for indentation. You can see an example of this below. Continue reading “YAML Syntax”
可能是市场上唯一能够以真正的面向对象方式设计和编程的开源过程控制系统。Powered By SSAB.
General
ProviewR is an Open Source Process Control System. It is modern, powerful and general and contains all functions normally required for successful sequential control, adjustment, data acquisition, communication, supervision, etc.
The configuration of a ProviewR system is done graphically, making the application adaptation simple, reliable, and flexible. ProviewR is a distributed system, which means that the system can consist of several computers, connected via a network, preferably ethernet. A typical ProviewR system consists of one process control system and one or more operator stations. It is easy to configure one operating station to become the HMI-system of several control systems.
Programming is possible both with a graphical PLC-editor and with high level programming languages (such as C, C++, Java or FORTRAN). The concept of Proview is based on a soft-PLC solution which runs on standard computers with Linux as operating system.
Performance
The great advantage of using standard hardware and soft-PLC is that system size, properties and performance is mainly limited by the hosting operating system and its hardware. In Proview there are no limits in number of I/O, PID loops, PLC programs, counters etc. The minimum cycle time for a PLC loop is less than 1 ms.
Communication
ProviewR can communicate with other computers both via ethernet network (ip) and via serial mechanisms. ProviewR supports several different protocols, such as UDP or TCP sockets via ethernet and Siemens 3964R on serial links.
I/O system
The most common used I/O system in Proview is Profibus/DP, a robust and well-tested field bus. There are also support for Profinet, Ethernet Powerlink, Modbus TCP and RTU, PSS9000, 1-wire, some USB I/O cards etc. The Modular design of the I/O system and the fact that ProviewR is based on Linux and high level languages makes it easy to implement other I/O systems with available drivers or develop new ones.
Object Orientation
ProviewR is the only control system on the market that can work in a truly object oriented way. Programming can be made in a traditional way with simple function blocks and simple signals. ProviewR though has support for creating complex objects and function objects that work upon them.
Object oriented concepts such as inheritance, methods and aggregates are supported.
Open Source
ProviewR is probably the first Open Source system for process control in the world. Originally developed in Sweden by Mandator and SSAB Oxelösund as a process control system based on standard computers, the system has become a fully-fledged, integrated and low-cost solution that is running on standard PC’s with Linux operating system.
ProviewR is Open Source and the license is GNU/GPL. You can download ProviewR, use it, modify it and redistribute it as much as you like as long as you follow the license terms.
YARP is a library to help create reverse proxy servers that are high-performance, production-ready, and highly customizable. Right now it’s still in preview, but please provide us your feedback by going to the GitHub repository.
We found a bunch of internal teams at Microsoft who were either building a reverse proxy for their service or had been asking about APIs and tech for building one, so we decided to get them all together to work on a common solution, this project.
YARP is built on .NET using the infrastructure from ASP.NET and .NET (.NET Core 3.1 and .NET 5.0). The key differentiator for YARP is that it’s been designed to be easily customized and tweaked via .NET code to match the specific needs of each deployment scenario.
We expect YARP to ship as a library, project template, and a single-file exe, to provide a variety of choices for building a robust, performant proxy server. Its pipeline and modules are designed so that you can then customize the functionality for your needs. For example, while YARP supports configuration files, we expect that many users will want to manage the configuration programmatically based on their own configuration management system, YARP will provide a configuration API to enable that customization in-proc. YARP is designed with customizability as a primary scenario rather than requiring you to break out to script or rebuild the library from source.
支持(仅列举部分):
Header Routing
Proxy routes specified in config or via code must include at least a path or host to match against. In addition to these, a route can also specify one or more headers that must be present on the request.
Authentication and Authorization
The reverse proxy can be used to authenticate and authorize requests before they are proxied to the destination servers. This can reduce load on the destination servers, add a layer of protection, and ensure consistent policies are implemented across your applications.
Cross-Origin Requests (CORS)
The reverse proxy can handle cross-origin requests before they are proxied to the destination servers. This can reduce load on the destination servers and ensure consistent policies are implemented across your applications.
Session Affinity:
Session affinity is a mechanism to bind (affinitize) a causally related request sequence to the destination handled the first request when the load is balanced among several destinations. It is useful in scenarios where the most requests in a sequence work with the same data and the cost of data access differs for different nodes (destinations) handling requests. The most common example is a transient caching (e.g. in-memory) where the first request fetches data from a slower persistent storage into a fast local cache and the others work only with the cached data thus increasing throughput.
Load Balancing
Whenever there are multiple healthy destinations available, YARP has to decide which one to use for a given request. YARP ships with built-in load-balancing algorithms, but also offers extensibility for any custom load balancing approach.
Transforms
When proxying a request it’s common to modify parts of the request or response to adapt to the destination server’s requirements or to flow additional data such as the client’s original IP address. This process is implemented via Transforms. Types of transforms are defined globally for the application and then individual routes supply the parameters to enable and configure those transforms. The original request objects are not modified by these transforms, only the proxy requests.
Destinations Health Checks
In most of the real-world systems, it’s expected for their nodes to occasionally experience transient issues and go down completely due to a variety of reasons such as an overload, resource leakage, hardware failures, etc. Ideally, it’d be desirable to completely prevent those unfortunate events from occurring in a proactive way, but the cost of designing and building such an ideal system is generally prohibitively high. However, there is another reactive approach which is cheaper and aimed to minimizing a negative impact failures cause on client requests. The proxy can analyze each nodes health and stop sending client traffic to unhealthy ones until they recover. YARP implements this approach in the form of active and passive destination health checks.
Some data within a database remains present in all shards, but some appears only in a single shard. Each shard (or server) acts as the single source for this subset of data.
Database architecture
Horizontal partitioning is a database design principle whereby rows of a database table are held separately, rather than being split into columns (which is what normalization and vertical partitioning do, to differing extents). Each partition forms part of a shard, which may in turn be located on a separate database server or physical location.
There are numerous advantages to the horizontal partitioning approach. Since the tables are divided and distributed into multiple servers, the total number of rows in each table in each database is reduced. This reduces index size, which generally improves search performance. A database shard can be placed on separate hardware, and multiple shards can be placed on multiple machines. This enables a distribution of the database over a large number of machines, greatly improving performance. In addition, if the database shard is based on some real-world segmentation of the data (e.g., European customers v. American customers) then it may be possible to infer the appropriate shard membership easily and automatically, and query only the relevant shard.
A heavier reliance on the interconnection between servers.
Increased latency when querying, especially where more than one shard must be searched.
Data or indexes are often only sharded one way, so that some searches are optimal, and others are slow or impossible.
Issues of consistency and durability due to the more complex failure modes of a set of servers, which often result in systems making no guarantees about cross-shard consistency or durability.
In practice, sharding is complex. Although it has been done for a long time by hand-coding (especially where rows have an obvious grouping, as per the example above), this is often inflexible. There is a desire to support sharding automatically, both in terms of adding code support for it, and for identifying candidates to be sharded separately. Consistent hashing is a technique used in sharding to spread large loads across multiple smaller services and servers.
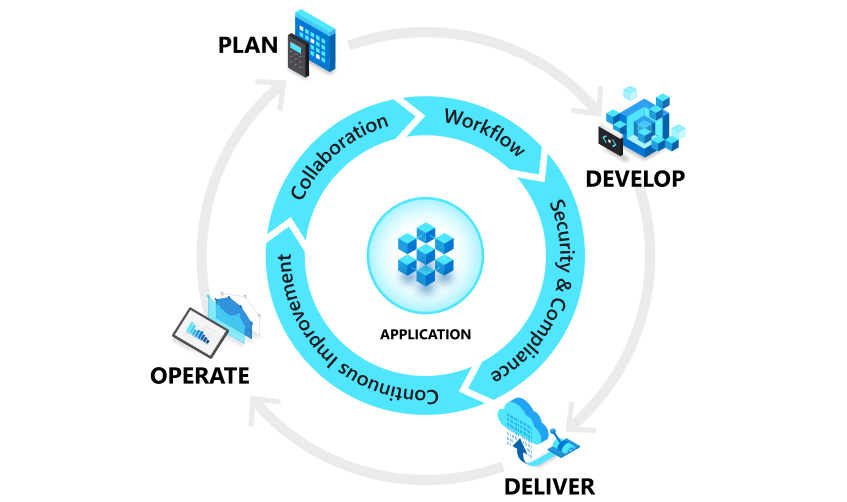
A compound of development (Dev) and operations (Ops), DevOps is the union of people, process, and technology to continually provide value to customers.
What does DevOps mean for teams? DevOps enables formerly siloed roles—development, IT operations, quality engineering, and security—to coordinate and collaborate to produce better, more reliable products. By adopting a DevOps culture along with DevOps practices and tools, teams gain the ability to better respond to customer needs, increase confidence in the applications they build, and achieve business goals faster.
The benefits of DevOps
Teams that adopt DevOps culture, practices, and tools become high-performing, building better products faster for greater customer satisfaction. This improved collaboration and productivity is also integral to achieving business goals like these:
Accelerating time to market
Adapting to the market and competition
Maintaining system stability and reliability
Improving the mean time to recovery
DevOps and the application lifecycle
DevOps influences the application lifecycle throughout its plan, develop, deliver, and operate phases. Each phase relies on the others, and the phases are not role-specific. In a true DevOps culture, each role is involved in each phase to some extent.
Plan
In the plan phase, DevOps teams ideate, define, and describe features and capabilities of the applications and systems they are building. They track progress at low and high levels of granularity—from single-product tasks to tasks that span portfolios of multiple products. Creating backlogs, tracking bugs, managing agile software development with Scrum, using Kanban boards, and visualizing progress with dashboards are some of the ways DevOps teams plan with agility and visibility.
Develop
The develop phase includes all aspects of coding—writing, testing, reviewing, and the integration of code by team members—as well as building that code into build artifacts that can be deployed into various environments. DevOps teams seek to innovate rapidly without sacrificing quality, stability, and productivity. To do that, they use highly productive tools, automate mundane and manual steps, and iterate in small increments through automated testing and continuous integration.
Deliver
Delivery is the process of deploying applications into production environments in a consistent and reliable way. The deliver phase also includes deploying and configuring the fully governed foundational infrastructure that makes up those environments.
In the deliver phase, teams define a release management process with clear manual approval stages. They also set automated gates that move applications between stages until they’re made available to customers. Automating these processes makes them scalable, repeatable, controlled. This way, teams who practice DevOps can deliver frequently with ease, confidence, and peace of mind.
Operate
The operate phase involves maintaining, monitoring, and troubleshooting applications in production environments. In adopting DevOps practices, teams work to ensure system reliability, high availability, and aim for zero downtime while reinforcing security and governance. DevOps teams seek to identify issues before they affect the customer experience and mitigate issues quickly when they do occur. Maintaining this vigilance requires rich telemetry, actionable alerting, and full visibility into applications and the underlying system. Continue reading “DevOps”
A system of record is the authoritative data source when information is scattered among various data providers. When we introduce a caching solution, we automatically duplicate our data. To avoid inconsistent reads and data integrity issues, it’s very important to synchronize the database and the cache (whenever a change occurs in the system).
There are various ways to keep the cache and the underlying database in sync and this article will present some of the most common cache synchronization strategies.
Cache-aside
The application code can manually manage both the database and the cache information. The application logic inspects the cache before hitting the database and it updates the cache after any database modification.
Mixing caching management and application is not very appealing, especially if we have to repeat these steps in every data retrieval method. Leveraging an Aspect-Oriented caching interceptor can mitigate the cache leaking into the application code, but it doesn’t exonerate us from making sure that both the database and the cache are properly synchronized.
Read-through
Instead of managing both the database and the cache, we can simply delegate the database synchronization to the cache provider. All data interaction is, therefore, done through the cache abstraction layer. Continue reading “Cache synchronization strategies”
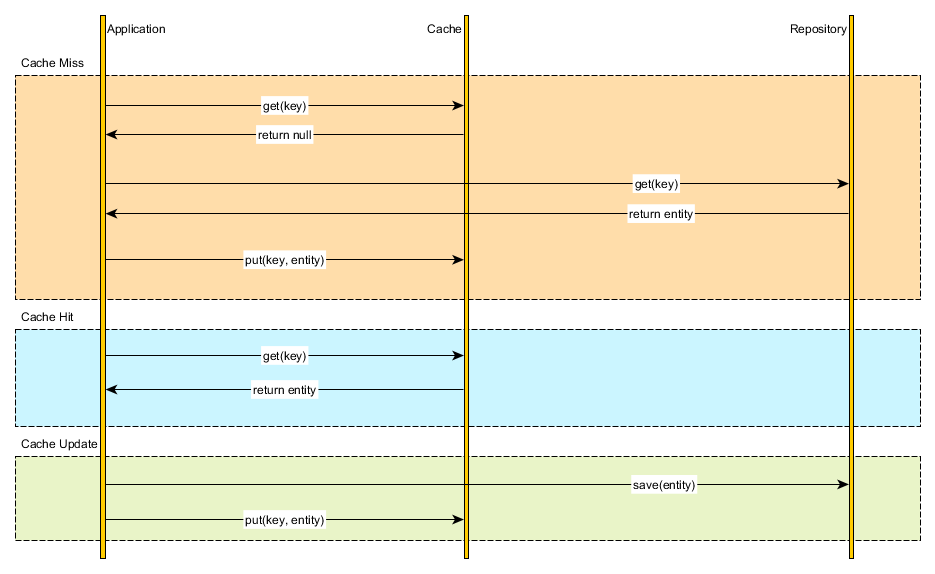
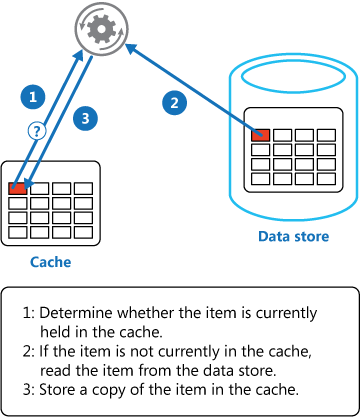
Load data on demand into a cache from a data store. This can improve performance and also helps to maintain consistency between data held in the cache and data in the underlying data store.
Context and problem
Applications use a cache to improve repeated access to information held in a data store. However, it’s impractical to expect that cached data will always be completely consistent with the data in the data store. Applications should implement a strategy that helps to ensure that the data in the cache is as up-to-date as possible, but can also detect and handle situations that arise when the data in the cache has become stale.
Solution
Many commercial caching systems provide read-through and write-through/write-behind operations. In these systems, an application retrieves data by referencing the cache. If the data isn’t in the cache, it’s retrieved from the data store and added to the cache. Any modifications to data held in the cache are automatically written back to the data store as well.
For caches that don’t provide this functionality, it’s the responsibility of the applications that use the cache to maintain the data.
An application can emulate the functionality of read-through caching by implementing the cache-aside strategy. This strategy loads data into the cache on demand. The figure illustrates using the Cache-Aside pattern to store data in the cache.
If an application updates information, it can follow the write-through strategy by making the modification to the data store, and by invalidating the corresponding item in the cache.
When the item is next required, using the cache-aside strategy will cause the updated data to be retrieved from the data store and added back into the cache. Continue reading “Cache-Aside pattern”